[Solved] 4 Ways to Backup Everything on Samsung Galaxy S4
Samsung Backup
- Data Backup
- 1. Back Up Samsung to Google Drive
- 2. Backup Contacts on Samsung
- 3. Backup Text Messages on Samsung
- 4. Backup Photos on Galaxy
- 5. Backup Samsung Galaxy to PC
- 6. Samsung Cloud Backup Services
- 7. Backup Samsung Contacts Solutions
- 8. Samsung Message Backup Solutions
- 9. Samsung Photo Backup Solutions
- Device Backup
- 1. Backup Android to Mac
- 2. Backup and Restore Samsung
- 3. Backup Everything on Samsung
- 4. Samsung Backup Solutions
- 5. Backup Samsung S10 to PC
- WhatsApp Backup
- 1. Backup WhatsApp Business
- 2. Top 8 WhatsApp Backup Solutions
- 3. 2 Ways to Backup WhatsApp to Mac
- 4. Backup WhatsApp to PC
- 5. Recover WhatsApp Messages
- 6. WhatsApp Backup Extractor
- Samsung Kies
- 1. Samsung Kies 3
- 2. Alternatives to Samsung Kies
- 3. Best Samsung Kies Alternatives
- 4. Samsung Kies Download
- 5. Samsung Kies Driver
- Samsung Tricks
- 1. Fix Samsung Brick
- 2. Recover Data from Dead Samsung
- 3. Flash Samsung with Odin
- 4. Remove Google Account Bypass
- 5. Factory Reset Samsung Galaxy
- 6. Samsung Root Software
- 7. Transfer Files from Samsung to PC
- 9. Samsung Smart Switch Solutions
- 10. Bypass Lock Screen Pattern
- 11. 2 Ways to Unlock Samsung
- 12. Transfer Whatsapp Messages
- Backup Tips
- ● Manage/transfer/recover data
- ● Unlock screen/activate/FRP lock
- ● Fix most iOS and Android issues
- Back Up Now Back Up Now Back Up Now

Feb 29, 2024 • Filed to: Backup & Restore Data • Proven solutions
Do you have a Samsung Galaxy S4? Well, if you do have, you definitely need to know this. Have you been wondering how to backup Samsung Galaxy S4 device? Well if you still are, here we are to take you through some of the best ways of backing up your Samsung Galaxy S4 device. You own a smartphone and you know how important it is to have all the data in the smartphone backed up, given that we usually have all the important data including our contacts, messages, emails, documents, applications, and what not, in our smartphones. Losing out on any of the data present in the phone can land you in significant trouble and that makes it important to back up everything on your smartphone frequently. Now, this article provides you exactly what you require - 4 ways to backup everything on Samsung Galaxy S4.
Part 1: Backup Samsung Galaxy S4 to PC with Dr.Fone toolkit
Dr.Fone - Phone Backup (Android) is one of the reliable and safe tools to backup all the data present on your Samsung Galaxy S4 device. With extensive benefits like being able to selectively back up phone’s data with one click to preview and restore the backup to the device when required, this tool is the ideal one to go for to backup Samsung Galaxy S4. Here’s how you can back up all the data using this tool.
Dr.Fone - Phone Backup (Android)
Flexibly Backup and Restore Android Data
- Selectively backup Android data to the computer with one click.
- Preview and restore the backup to any Android devices.
- Supports 8000+ Android devices.
- There is no data lost during backup, export, or restoration.


Step 1: Install and launch Dr.Fone Android toolkit
First of all, install and launch Dr.Fone on the computer. Then select “Phone Backup” among all the toolkits.

Step 2: Connecting Samsung Galaxy S4 to the computer
Now, connect your Samsung Galaxy S4 device to the computer with the use of a USB cable. Ensure that you have enabled USB debugging on the phone or you might even get a pop-up message asking you to enable it. Tap “OK” to enable.

Note: If you have already used this program to backup your phone in the past, you can view the past backup by clicking on “View backup history” in the above screen.
Step 3: Select file types to back up
After your phone is connected to the computer, choose the file types you would like to Backup. You will find all the file types selected by default initially as shown in the picture below.

Click on “Backup” to start with the backup process. The backup process will take few minutes to complete. So, don’t disconnect the device from the computer until the backup process is complete.

You can click the “View Backup History” button to check for the backup files created.

Now, everything you had selected is backed up on the PC and the backup files can be used later on to restore the data to the phone.
Part 2: Backup Samsung Galaxy S4 to cloud with Google Account
Everything on your Samsung Galaxy S4 can be backed up to the cloud with Google Account. Samsung Galaxy S4 configured with a particular Google account can be used in a way where everything on the phone is automatically backed up to the Google cloud which can be easily restored if you configure back the phone with the same Google account. Here is how you can backup Samsung Galaxy S4 to cloud with Google account:
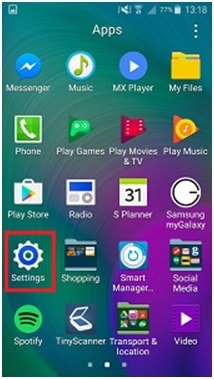
Step 1: First of all, tap on Apps on the home screen of your Samsung Galaxy S4 device.

Step 2: Now, tap on “Settings” to get inside as shown in the picture below.
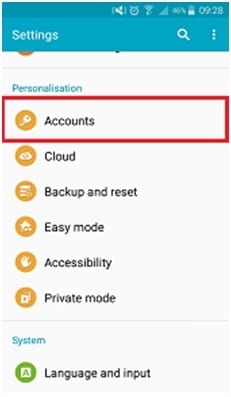
Step 3: Scroll completely down to the Personalization section in Settings and tap “Accounts”.
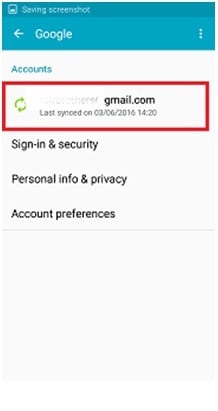
Step 4: Tap on “Google” to select the account to back up the data.

Step 5: Now tap on your email address and you will find a list of data types that you can back up to your configured Google account as shown in the figure below.
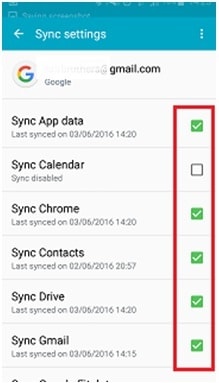
Tick the boxes beside the types of data you want to back up as shown in the picture above.
Step 6: Now tap on the three dots present at the top right corner of the window. You might even find the “More” button instead of the three dots.

Tap on “Sync Now” to sync all the data types present on the device with your Google account as shown in the picture below.
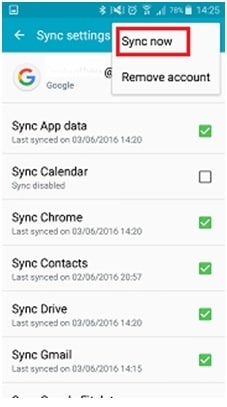
So, all the data on the phone will be synced with the Google account.
Part 3: Backup Samsung Galaxy S4 with app Helium
Helium application is one of the prominent applications which can be used to back up the data present on the phone. So, your Samsung Galaxy S4 device can be backed up using Helium application which is available for free in the Google Play Store. One of the best features of this application is that this does not require rooting. So, you can back up all the data present on the Samsung device which having to root the device. Here is how you can use this application:
Step 1: Install the application
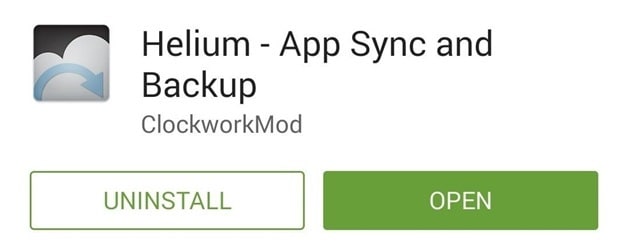
Helium works only when you pair your phone with your computer. This way helps to send commands from the computer for proper Android backup. So, install the Helium application on the Samsung device and on the computer. Download the Android Helium application from the Google Play Store.
Step 2: Application setup on the device
You would be asked if would like to connect your Google account for cross-device backup sync for multiple devices after you have installed the app. Tap on “OK” to continue and feed the Google account details.
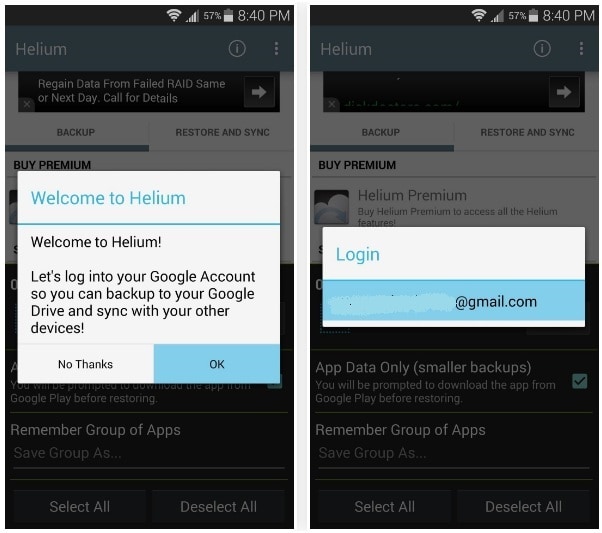
Tap on “OK” and Helium application will prompt you to connect the phone with the computer. So, use a USB cable to connect the phone to the computer.
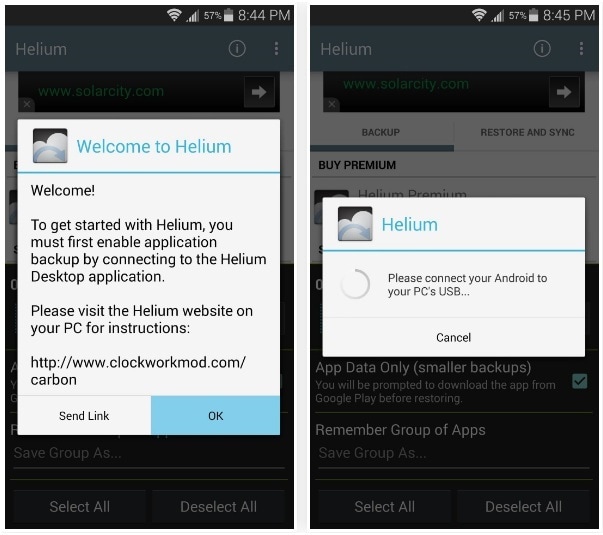
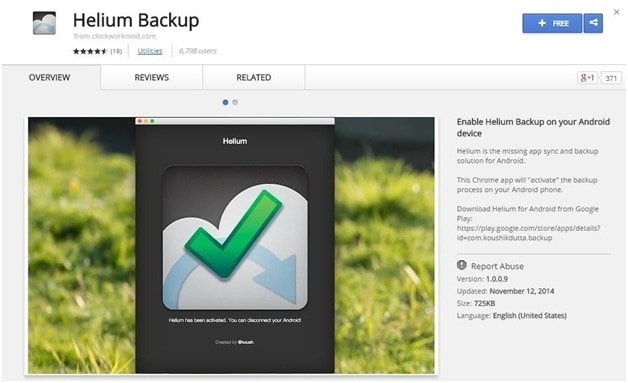
Step 3: Install Helium on Chrome
Google Chrome browser is available for all platforms. Have it installed on the system, install the Helium Chrome app. Click on the “+Free” button to add this to the browser by clicking “Add” on the popup.
Step 4: Syncing the Android device with the computer
Now, keep the Samsung Galaxy S4 connected with the computer while you open the Helium app on both the computer and phone.
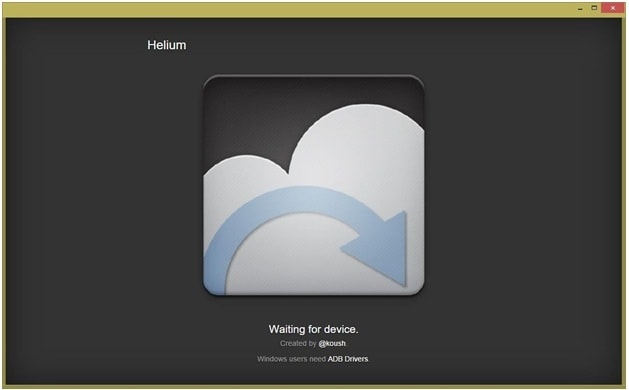
Both the devices will be paired within a few seconds and a comprehensive backup will be enabled. You can now disconnect the phone from the computer.

Note: The phone resets the changes made by Helium every time it restarts. Repeat the pairing process when you reboot your phone.
Step 5: Backup the applications
On the Samsung device, use the Helium application now to select which applications have to be backed up. When you tap on the “Backup” button, Helium will ask you to choose the destination to store the backup file. You can choose Google Drive if you want your multiple Android devices to get synced later.
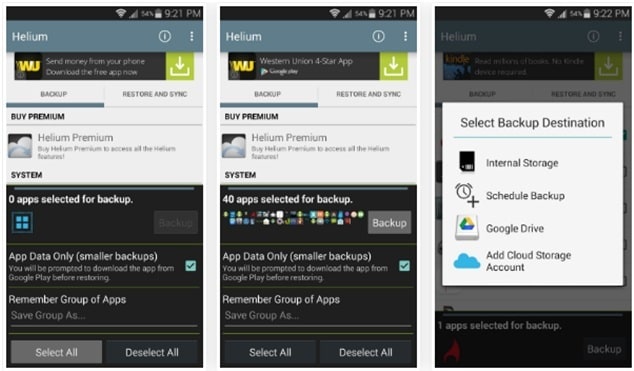
Tap on “Restore and Sync” tab and then select your storage location for backup files. You can use Helium app backup data and choose your suitable destination to keep the backup files.
Part 4: Backup Galaxy S4 with built-in Backup feature
Samsung Galaxy S4 can be backed up using the auto backup feature of the device which comes built-in with the device. This is a very easy and simple process and can be enabled in a few seconds to enable auto backup. So, this helps in automatically backing up the data in the Samsung Galaxy S4 device to cloud periodically. Now, here is how you can enable the auto-backup feature of Samsung Galaxy S4 to backup all the data automatically:
Step 1: From the Home Screen of the Samsung Galaxy S4 device, tap on the Menu button or “Apps” button.
Step 2: Now, choose “Settings” and under the “Accounts” tab, scroll down to “Backup Options”. Tap on Cloud.
Step 3: Now, on the next screen, tap Backup. You will find the “Auto Backup Menu” and at the bottom, you will find an indicator disabled. Now, tap the “Auto Backup” option. Now, swipe the slider to the right so it turns green. This will activate the “Auto Backup” Feature of the phone. Tap on “OK” when you get a confirmation message.
So, you can use this method to backup everything on Samsung Galaxy S4.
These are some of the methods which you can use to backup Samsung Galaxy S4 simply. Hope it helps you choose the best one for yourself.


Alice MJ
staff Editor