


How to Upload Custom Videos to Vine
Vine has taken the online and smartphone world by storm, and more and more people are installing the app to their mobile devices and sign up as a member. Vine is mobile video sharing platform that has become a great method of entertainment for a lot of people today. If you are a new Vine user and want to upload interesting or funny videos that plays for 6-seconds, you might want to know how other Vine users upload videos to the app that are already customize. If you don't have knowledge about Vine, this might come as very complicated, but of course, there is always a simple way to do it. If you want to learn how to, keep reading below for two methods uploading custom videos to your Vine and show it to the world.
Method 1: Using iExplorer
iExplorer is a computer software that allow you to transfer files from any devices like iPhone, iPod, iPad, or Mac and even PC. You can do this by simply dragging and dropping the files to iTunes. In order to learn more how to use it with making custom Vines, read and understand the step by step instruction below.
What to prepare before the process:
- USB Cord
- The 6-second mp4 video file of what you want to upload to your Vine (Already edited video)
Step 1: Install iExplorer to your Mac or PC

Go to iExplorer page and click the download button to download the demo version for free, but if you want to take full advantage of the software, you can buy the full version for as low as $34.99.
When the downloading is done, install the software to computer by double clicking the exe file (for PC) and letting it install by accepting the agreement and clicking next button.
Note: To successfully install iExplorer, you will require having QuickTime in your PC.
Step 2: Connect your iOS Device to Your Computer Using USB Cord

When the installation is done, grab your USB cord or connector to use it to connect your iOS phone or other iOS device you want to use to your computer where the iExplorer is installed. At first attempt, it may take more than a few minutes for your device to be detected, but after the initial attempt, next time you will connect your device again to iExplorer, it's going to be faster. When the connecting of your device has become successful, the iExplorer will automatically launch, otherwise, you can manually launch it.
Step 3: Open the Folder Where the Video Will Be Saved and Place the Video You Want To Upload
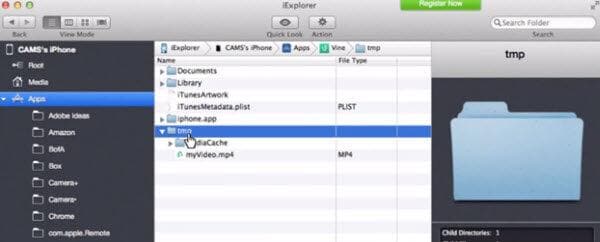
Navigate the software window and find to the 'tmp' folder by going to File > Apps > Vine > tmp, this is where the video you will record and recorded will be saved. It also automatically generates thumbnail picture for your video.
Open the folder and place the video that is already edited inside the folder, you can do this by dragging and dropping that video to the tmp folder.
Step 4: Launch Vine app and record a clip

Launch the Vine app from your Device and Record a video clip of anything you want by holding your thumb on the screen of your iOS device, make sure that you don't record beyond the limit; you can record the video until the green checkmark shows up.
You can record a video of anything, it does not matter as the video you will record will be replaced by the video you have already edited and want to upload to your vine account.
Step 5: Refresh the 'tmp' Folder Immediately and Rename the Files
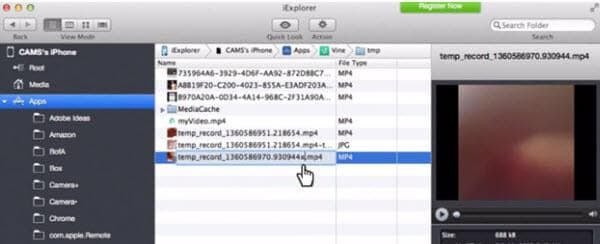
Once you are done with recording a video with Vine, go back out of the tmp folder, refresh it, and then go back inside again, you will see that the temporary record is already in there. The next thing you have to do is to rename the temporary record, for example, you can add an 'x' at the end of it to make it different. After that, select the video that you have edited and want to upload to your Vine account. As the Vine processes the video you have just recorded with your phone, the custom video will replace it on the app.
Step 6: Go Back To the Vine App and Finish the Recording

Go lunch the Vine again and it will make you resume the video you have recorded, tap the checkmark on the bottom right side of the screen and the video you have edited will appear on the screen of your iPhone. Tap on next button and then add caption to your video, and done!
Method 2: Using Vine Uploader App
If you want to upload custom Vine videos without using your computer, another alternative is by installing an app to your device. Though both methods are easy and efficient to use, this method is faster and more convenient than the first one. You can use the Vine Uploader app that you can buy install to your iOS devices for free or buy it for ad-free app. To know how to upload custom video to your Vine account using this app, read the step by step process below.
Step 1: Install the Software

Go to the App Store and search "Vine Uploader" install the first one that will show up to the result page.
Step 2: Sign In Your Vine Account

You don't have to sign up or make an individual account for this app to use it, use your Vine login to sign in, you can also simply link your Twitter or email for easier sign in process.
Step 3: Choose the Custom Video You Want To Upload

Even before using the app, it is better if you already have the custom video you want to upload saved to your Camera Roll, after signing in, you will be prompt with the list of the videos saved to your Camera Roll, tap the one you want to upload.
Step 4: Choose the Part You Want To Upload

You have to remember that Vine only allows you to upload 6-second videos on loop. Choose which part you want to upload, this is necessary if your video is longer than 6 seconds.
Step 5: Crop/Edit the Part You Want To Appear On Vine

Just like Instagram, Vine doesn't allow you to upload landscape or portrait file, you have to crop the video in square, so choose which part of the screen is the most important by dragging the square on it. When the cropping is done, you can also apply effects or filter on the video.
Step 6: Upload the Video

JWhen you're done editing the video clip, you can now add any caption you want and hashtags related to the Vine post, and then tap Upload button. Wait for the uploading to complete, this should only take few seconds.
Step 7: Check out Your Vine

Go back to home and launch your Vine account, check out the vine you have just uploaded.
