
How to Play Pokemon Go on PC with/without BlueStacks

Apr 16, 2024 • Filed to: Virtual Location Solutions • Proven solutions
- Part 1: How BlueStacks works with Pokemon Go
- Part 2: Play Pokemon Go on PC with BlueStacks (1 hour to set up)
- Part 3: Play Pokemon Go on PC without Bluestacks (5 min to set up)
Part 1: How BlueStacks works with Pokemon Go
BlueStacks App Player is basically an Android emulator. Its work is to run or play your desired app or game in your PC. We all are aware of the fact that Pokemon Go is a game the demands going outside to hunt the Pokemon characters. And in this process, many users get frustrated to see their battery drainage so fast. There comes BlueStacks for Pokemon Go handy. BlueStacks’ full customizable environment and support makes it the best choice for playing games on computer. When you have BlueStacks with you, you can install Pokemon Go in it and use the customize controls. The BlueStacks can be configured to work with Google Play account so that Pokemon Go can be easily accessed. In this article, we will cover how you can play Pokemone Go with BlueStacks on your PC.
Part 2: Play Pokemon Go on PC with BlueStacks (1 hour to set up)
Let us know how to play Pokemon Go in BlueStacks in this section. Read carefully the requirements and setting up process so as to get everything done smoothly.
2.1 Preparations
Before you learn why BlueStacks for Pokemon Go in 2020 is a great idea, we want to make you aware with some of the essentials. Once you are thorough with the prerequisites, we will let you learn how to play Pokemon Go in BlueStacks. Let us explore!
Requirements:
- To use this Android emulator, your Windows should be Windows 7 or higher version. If you are a Mac user, it should be macOS Sierra and higher.
- The system memory should be of 2GB and more as well as 5GB hard drive. In case of a Mac, there should be 4GB RAM and 4GB disk space.
- You should have admin rights in order to install the software.
- Keep the graphic card driver version updated.
Needed Tools:
- Firstly, of course you have to have BlueStacks through which you can play the game on PC.
- You will be required a tool that can help you root your Android device. And for this, you need to have KingRoot. Having root access to Android device is necessary to make Pokemon Go happen on PC.
- Next up, you need Lucky Patcher. This tool lets you deal with the app permissions. You can control the permissions when the app is installed on your device.
- Another app that you will need is Fake GPS Pro in order to spoof the location. Since Pokemon Go is a game that demands you to keep moving in real time and this app will help you do that. However, the app is paid and costs $5. But you can take help of third-party app stores to download it for free.
- After you download the above tools and apps, it’s time to go for Pokemon GO apk.
2.2 How to set up Pokemon Go and BlueStacks
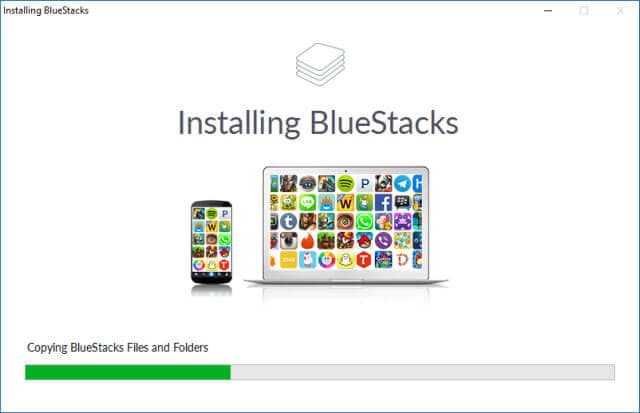
Step 1: Get BlueStacks Installed
To begin, download and install BLueStacks on your computer. Followed by this, you are required to set up your Google account to make things go smoother.
Step 2: Install and Open KingRoot
Download the KingRoot apk in the first place. Once done, you need to open BlueStacks to install it. Hit on the “APK” icon on the left. Look for the respective APK file and the KingRoot app will install itself.

When installed, run KingRoot and hit on “Try it followed by “Fix now”. Click “Optimize now” and exit KingRoot as it will not be needed anymore now.

Step 3: Start BlueStacks Again
Now, you have to restart BlueStacks. For this, click the cogwheel icon which means the Settings. Click on “Restart Android Plugin” after that from the drop down menu. BlueStacks will be restart.

Step 4: Install Fake GPS Pro
Now, you need to download Fake GPS Pro from the Play Store. Install it the same way you did for KingRoot.
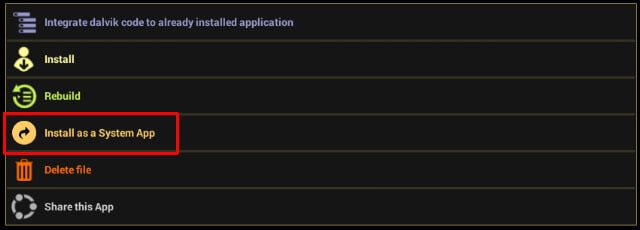
Step 5: Get Lucky Patcher Installed
The installation for this also goes the same way as KingRoot. Click the “APK” and browse your apk file. After you install it, open Lucky Patcher. Hit on “Allow” to give access to the installed apps.
When it is opened, head to the “Rebuild & install” option at the bottom right. Now, move to “sdcard” followed by “Windows” > “BstSharedFolder”. Now, choose APK file for Fake GPS and hit on “Install as a System App”. Hit “Yes” to confirm and proceed for installation.
Next, you again need to restart BlueStacks. You can refer to the step 3 for this.
Step 6: Install Pokemon Go
Download Pokemon Go and install it simply as you did for the above apps. However, don’t launch it right now as it will not work.
Step 7: Tweak Location Settings
In BlueStacks, click Settings (cogwheel) and choose “Location”. Set the mode to “High accuracy. Disable any GPS service for now to avoid any interference. And for this, press “Windows + I” and go to “Privacy”. Head to “Location” and turn it off. For previous versions than Windows 10, open Start menu and search Location. Disable it now.

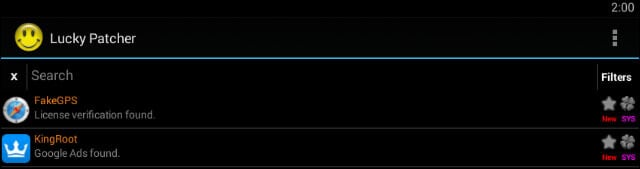
Step 8: Set up Fake GPS Pro
You need to return to the Lucky Patcher app. Here, you could see the Fake GPS in the list. If not, head to the “Search” at the bottom and choose “Filters”. Mark “System Apps” and hit “Apply”.
You can now select FakeGPS from the list and click “Launch App”. A pop-up windows will come that will tell you instructions with the heading “How to operate”. Read them and hit “OK” to close it.
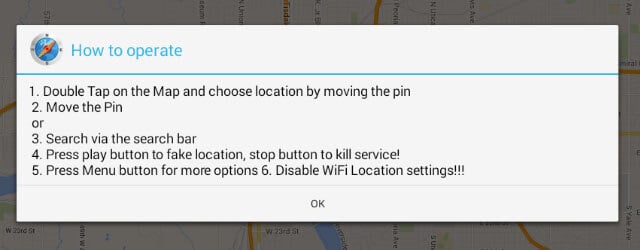
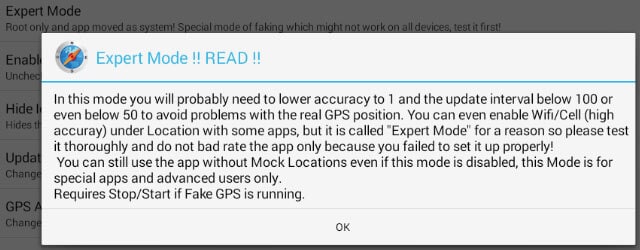
Now, hit on the three dotted button located at the top right. Head to “Settings” and mark “Expert Mode”. A warning message will appear. Read it and hit “OK”.
Hit on the back arrow given at the top left. Choose the location you desire. Hit the entry and choose “Save”. This will add this particular location to favorites. Now, click the play button and fake location will be enabled.

You are all set to play the game now.
2.3 How to play Pokemon Go with Bluestacks
After you have followed the above instructions carefully, you can now play Pokemon Go in BlueStacks. Launch Pokemon Go now. And if you find it time consuming to launch, please don’t panic.
Set it up as you normally do in an Android device. Log in with Google and it will detect the account you attached with Pokemon Go earlier. When it launched, you will see yourself in the location you just faked above.
If any time you want t move to another spot, you need to open FakeGPS and set a new spot. To ease this, setting s few locations as favorites comes in handy.
You can now detect the Pokemon and if the camera doesn’t work, simply disable AR mode on asking. Confirm it and catch the Pokemons in virtual reality mode.
Part 3: Play Pokemon Go on PC without Bluestacks (5 min to set up)
3.1 Shortcomings of Bluestacks
No matter playing Pokemon Go in BlueStacks is fun, but there are indeed some shortcomings that come with it. Here we discuss them in the following points.
- Firstly, many of you can find the process a little complex. In fact, much complex! As there are lots of tools needed and many things are needed to keep in mind. This may become annoying and can mess with the system if not done properly.
- Secondly, BlueStakcs is not for beginners and non tech-savvy. At least this is what we feel. As mentioned already, there are plenty of things to be taken care of, so performed by tech person is what makes sense.
- It has high failure rate as said by many users.
3.2 How to play Pokemon Go on PC without Bluestacks
As you know the drawbacks linked with BlueStacks, you might be wondering how you can play Pokemon Go without BlueStacks. Well! If you are not comfortable with BlueStacks for Pokemon Go, we have a solution for you. You can get this game played by simply simulating your actual movement. You can show the fake route without moving. And to help you on this, you can take help of dr.fone – Virtual Location (iOS) . It has higher success rate and you can change and mock your location in minutes. Note that this tool is only for iOS devices for now. Here is how to work with this.

 Teleport GPS location to anywhere.
- Fake GPS Location on iOS and Android in one click.
- Simulate GPS movement along the route you draw and with different simulated speeds.
- Using Jump Teleport mode, you can easily jump to rare and legendary Pokémon.
- Enable you to use a joystick or keyboard to simulate GPS movement flexibly in Pokémon Go.
- Besides Pokémon GO, it also works smoothly with location-based apps and games, like Jurassic World Alive, Minecraft Earth, Snapchat, etc.
Method 1: Simulate Along a Route Between 2 Spots
Step 1: Download the Program
Begin to download the tool over your PC from the official website. Install it and run it over the computer. Now, click on “Virtual Location” option from the main interface.

Step 2: Establish Connection
Make a firm connection between your iPhone and the computer using the lightening cable. Now, hit on the “Get Started” button to move ahead.

Step 3: Choose 1-Stop Mode
From the next screen where the map is showing, click on the first icon right on the upper corner. This will enable the 1-Stop Mode. Once done, you need to select the spot where you want to move falsely.
Choose the walking speed after that. For this, you will see a slider at the bottom of the screen. You can drag it as per your choice to adjust the traveling speed. A pop up box will be shown where you have to click “Move Here” button.

Step 4: Start Simulating
A box will come up again. Here you are supposed to enter a digit that defines the numbr of times you wish to move. Hit on “March” right after that. Now, you will be able to see your location moving according to the speed you have selected.

Method 2: Simulate Along a Route for Multiple Places
Step 1: Run the Tool
As understood, start the program on your computer. Click on “Virtual Location” and connect device. Choose “Get Started” button.
Step 2: Choose Multi-stop Mode
From the three icons given on the right side of the screen, you have to choose the second one. This will be the Multi-stop Mode. Subsequently, you can try selecting all the spots you wish to fake moving.
Set the moving speed as you did earlier and click on “Move Here” from the pop up box.

Step 3: Decide the Movement
On the other pop up box you see, enter the number to tell the program about the number of times you wish to go back and forth. Click on “March” option. The movement will begin to simulate now.

Final Words
We dedicate this article to all the Pokemon Go lovers and who just wish to have this game on PC. You have learnt all the goods and bads about BlueStacks. We have also shared you the set up and playing process of Pokemon Go in BlueStacks. We hope that you liked our efforts. It will be great if you would write a word or two in the comment section below to let us know how we could help you. thank you for your time!


Virtual Location
- Change iOS Location
- 1. Best iOS Location Changers
- 2. Fake iPhone GPS Location
- 3. Change iPhone Home Address
- 4. Change iPad Weather Location
- 5. See Someone's Location on iPhone
- 6. iPhone GPS not Working
- 7. iPhone “No Location Found”
- 8. iPhone “Location Not Available”
- 9. iTools Alternatives
- 10. DoPokeGo++ Alternatives
- 11. 3uTools Alternatives
- 12. Foneazy MockGo Alternatives
- 13. "No Location Found" Vs."Location Not Available"
- Change Android Location
- 1. Best Android Fake GPS Apps
- 2. Free Android Location Spoofers
- 3. Fake Android GPS Location
- 4. Android Location Settings
- 5. Fake GPS No Root
- 6. Fake GPS on Huawei
- 7. Fake GPS without Mock Location
- Hide GPS Location
- 1. Change Location on Find My iPhone
- 2. Fake Location on Find My Friends
- 3. Stop Google Tracking Your Location
- 4. Fake Location on Google Maps
- 5. Spoof Location on Life360
- 6. Turn Off Life 360 Without Knowing
- 7. Stop Life360 from Tracking You
- 8. Life360 Circle: Tips & Tricks
- 9. Google Maps Giving Voice Directions
- 10. Stop From Being Tracked
- 11. Can Life360 Track You When Your Phone is Off
- Fake GPS on Games
- 1. Play Pokémon Go Without Moving
- 2. Celebrate National Pokémon Day
- 3. Fake GPS on Mobile Legends
- 4. Spoof Ingress Prime Location
- 5. Spoof Location on Jurassic World Alive
- Fake Location on Social Apps
- 1. Fake Location on Whatsapp
- 2. Fake Location on Facebook
- 3. Fake Location on Telegram
- 4. Fake Location on Tiktok
- 5. Fake Location on YikYak
- 6. Fake Location on Snapchat
- 7. Add Location Filters on Snapchat
- 8. Change Location on Twitter
- 9. Change Instagram Business Location
- 10. Change Instagram Region/Country
- 11. Stop mSpy from Spying You
- 12. Change Location On Linkedin
- Fake Location on Dating Apps
- 1. Fake Hinge GPS
- 2. Top Funny Hinge Prompts
- 3. Apps Like Tinder
- 4. Enjoy Tinder Gold
- 5. Fake Tinder GPS
- 6.Tinder Keeps Crashing
- 7. Find People on Tinder
- 8. Use Grindr on a PC
- 9. Grindr Web app explained
- 10. Fake Grindr GPS
- 11. Grindr Unable to Refresh
- 12. Fake Bumble GPS
- 13. Bumble Snooze Mode Guide
- 14. Tinder vs Bumble vs Hinge
- Get Around Geo-blocking
James Davis
staff Editor