How to Transfer Videos from PC to iPad Without iTunes-2024 Easy Guide

Mar 08, 2024 • Filed to: Manage Device Data • Proven solutions
Yeah! I know you can do it on iTunes. But that’s the common knowledge! In this article, we are talking about something else. We’ll show you how to transfer videos from your PC to iPad without iTunes.
There are a lot of apps that can do this job. We are now going to show you the five best ways. From direct transfers of videos or using cloud services, we've covered various methods to suit your specific needs.
So, if you're looking for ways to transfer videos, this guide will help you through every step of the way.
- Part 1. How Do I Transfer Movies from Computer to iPad with Cable?
- Part 2. How to Transfer Videos from Computer to iPad with Wondershare Dr.Fone?

- Part 3. How to Copy Files to iPad with VLC?
- Part 4. How to Transfer Videos from Computer to iPad with iCloud?
- Part 5. How to Transfer Videos from Computer to iPad with Google Drive?
Part 1. How Do I Transfer Movies from Computer to iPad with Cable?
This is a method that most people already know. That’s because it’s an equally simple and easy method. You don’t need any additional software or any deep technical knowledge. You simply connect your iPad to your PC and transfer the files through a cable.
However, the limitation is that it cannot transfer files other than photos and music. Additionally, this method requires a physical connection between your devices. So, it may not be convenient for everyone. Let’s see how to add a movie to iPad with cable step by step.
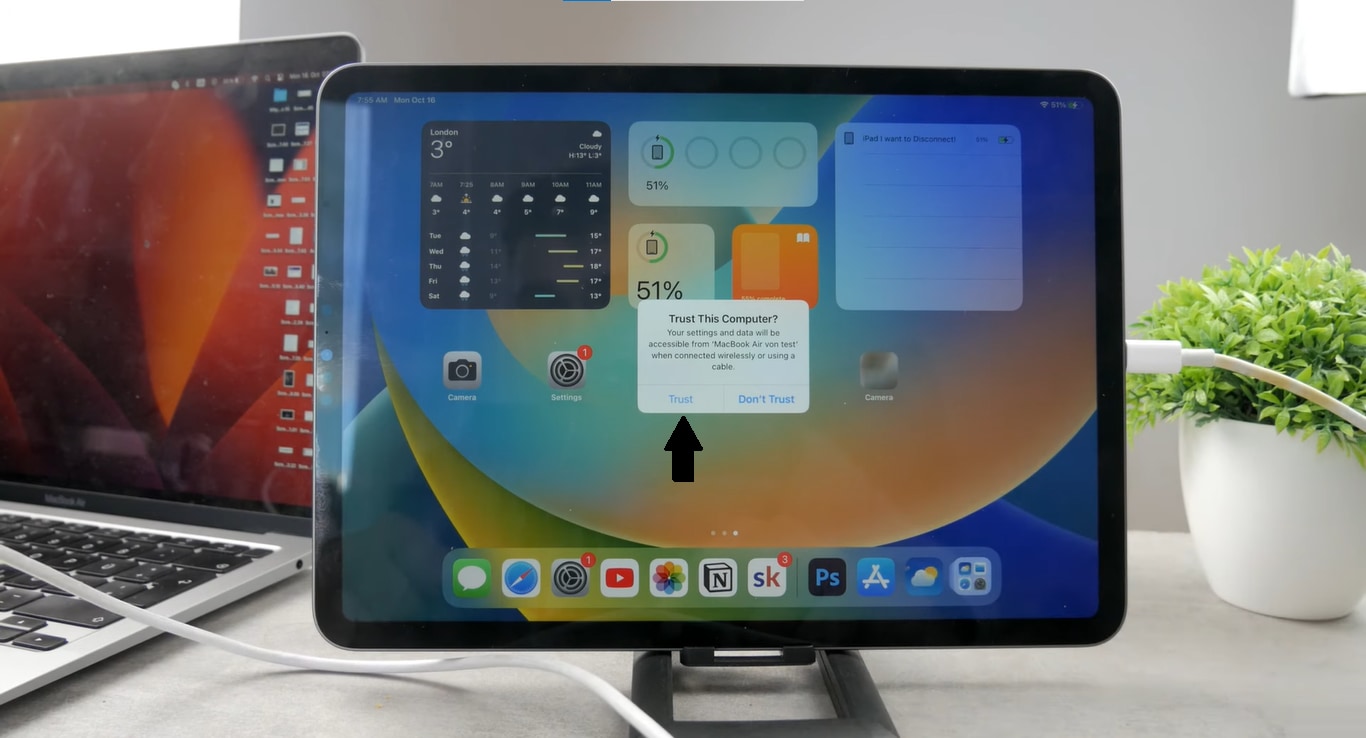
Step 1 First, use a USB cable to connect your iPad to your PC. Then, unlock your iPad and tap "Trust" to confirm the connection.
Step 2 Select the videos you want to transfer from your PC. Copy these files with Ctrl + C.
Step 3 Open "This PC" on your computer. Double-click on your iPad's name and go to Internal Storage > DCIM > 100APPLE.
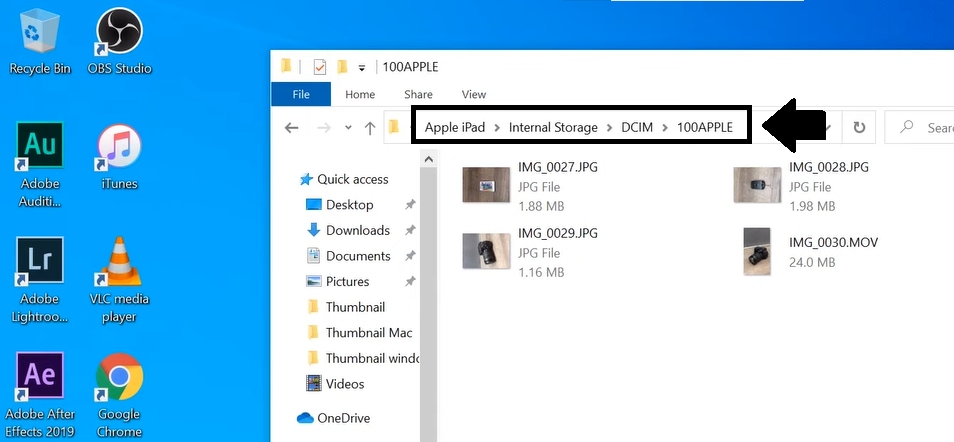
Step 4 Paste the copied video files into the DCIM folder. After transferring, disconnect your iPad from the PC. Check your iPad to make sure the videos are appearing on your iPad.
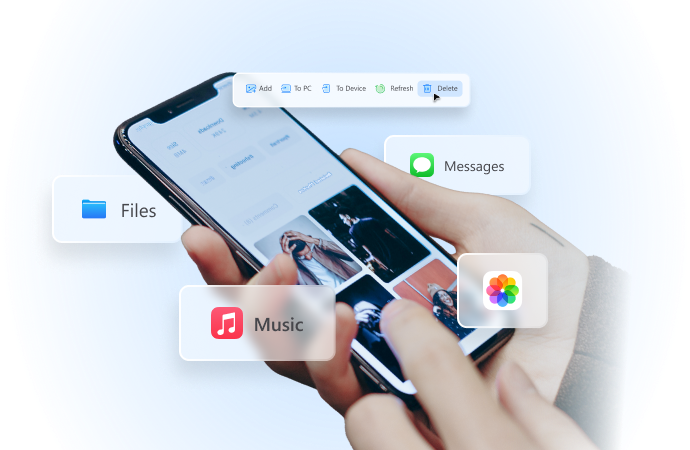
Part 2. How to Transfer Videos from Computer to iPad with Wondershare Dr.Fone?
Wondershare Dr.Fone is a powerful software tool designed for most management issues of mobile phones. You can easily use this tool and transfer video from a computer to an ipad. It's a useful method for those who prefer a specialized software solution for transferring their files.One of the advantages of Dr.Fone is its efficiency in transferring large files or multiple videos at once. Additionally, it provides a direct and secure connection between your computer and iPad.
You can also use Dr.Fone to transfer data between two mobile phones, Backup & Restore WhatsApp, or for screen mirroring. Let’s see how to transfer a video from laptop to ipad with Dr.Fone in a stepwise manner.
Dr.Fone - Phone Manager (iOS)
Transfer Photos from Computer to iPod/iPhone/iPad without iTunes
- Transfer, manage, export/import your music, photos, videos, contacts, SMS, Apps, etc.
- Back up your music, photos, videos, contacts, SMS, Apps, etc., to the computer and restore them easily.
- Transfer music, photos, videos, contacts, messages, etc., from one smartphone to another.
- Transfer media files between iOS devices and iTunes.
- Fully compatible with the newest iOS system.


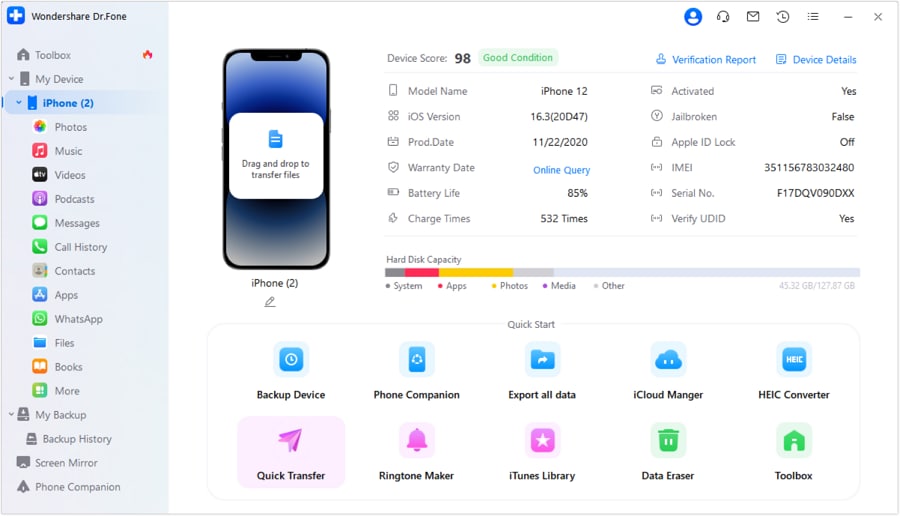
Step 1 First, open Wondershare Dr.Fone and connect the iPad to your computer. Once it's recognized, click on the “Quick Transfer” button located at the bottom of the home screen.
Step 2 A new window will appear. Here, click on the “Select Files” button. Now browse and choose the video files you wish to transfer from your computer.

Note: You also have the option to drag and drop the files into this window.
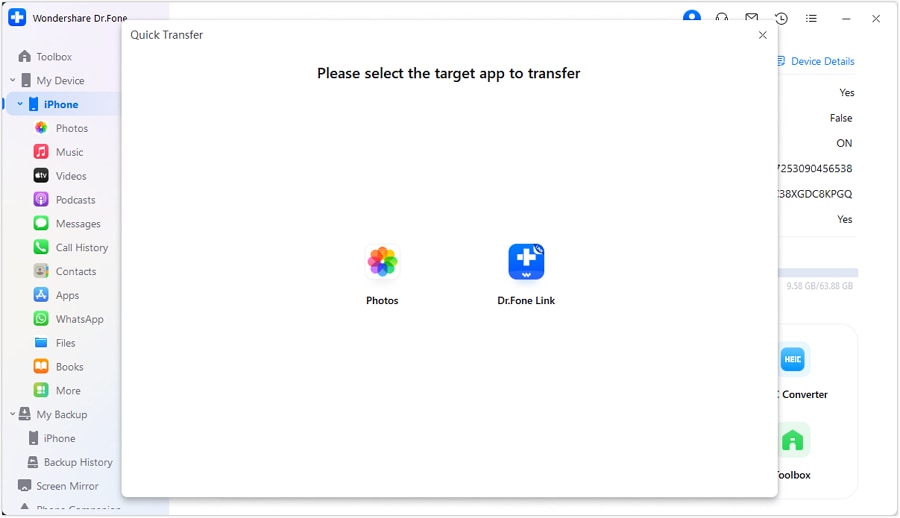
Step 3 After adding the files, Dr.Fone will prompt you to choose a target app. Select the application where you want to store the transferred videos.
Step 4 The next screen will show the ongoing transfer of your video files. If for any reason you need to stop the transfer, there's a “Cancel” button available.
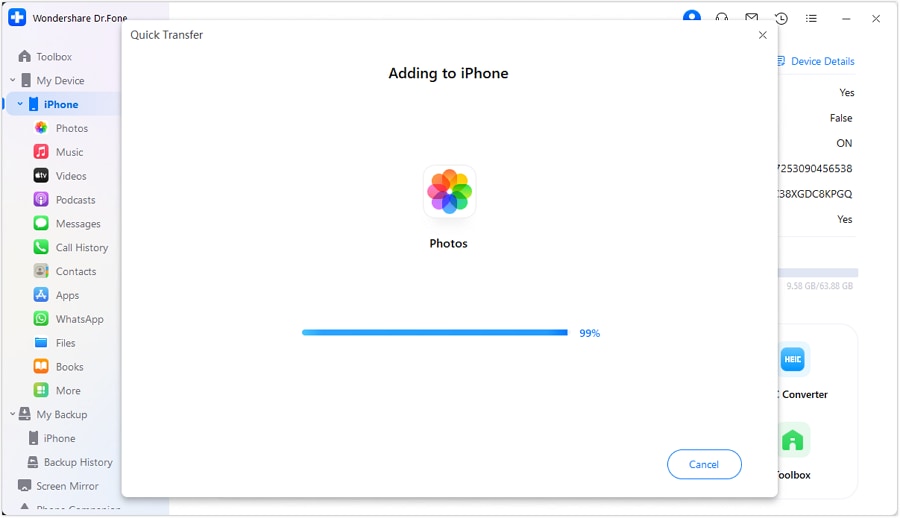
Step 5 A notification will appear once the transfer is complete. You can click on the small “i” icon to see where the videos are stored on your iOS device.

You can also use Dr.Fone for other data management tasks.
Part 3. How to Copy Files to iPad with VLC?
Everyone knows that VLC is a popular media player for videos and audio. You can take advantage of VLC's Wi-Fi sharing feature and transfer videos from a laptop to an iPad.
This method is useful because it allows for wireless transfer. It means you don't need a cable to connect your devices. You can also videos in formats that are not supported by iOS. However, a limitation is also present. It requires both your PC and iPad to be connected to the same Wi-Fi network.
Let’s see how to transfer movies to iPad without iTunes. We’ll be using VLC in this stepwise guide.
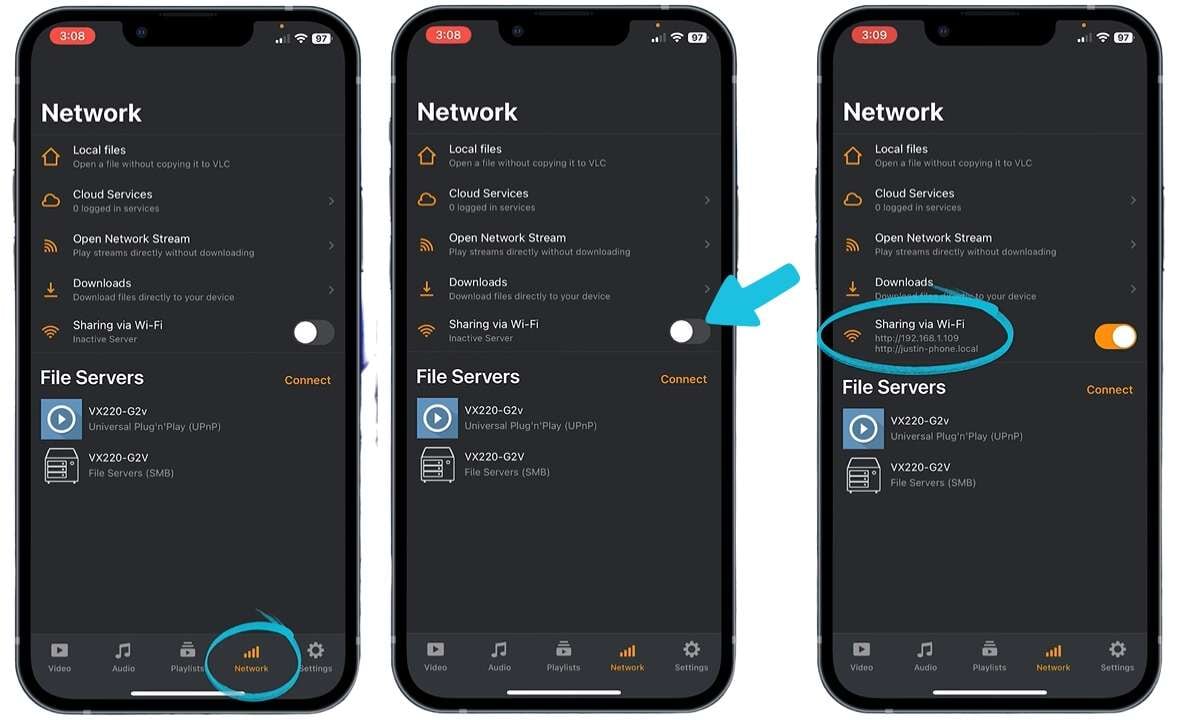
Step 1 Open the VLC app on your iPad. Go to the Network settings and toggle on the "Sharing via Wi-Fi" option. Now, note down the IP address displayed.
Step 2 On your PC, open some web browser like Chrome. Type the noted IP address into the browser's address bar. You’ll see a VLC web interface on your PC.
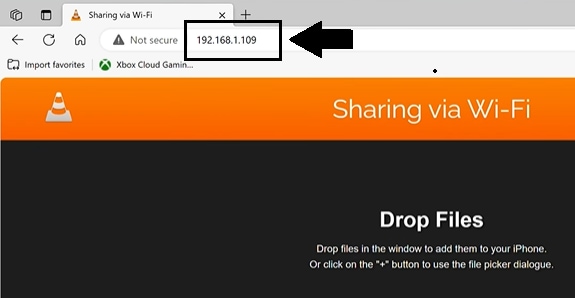
Step 3 Add videos on this VLC web interface. You can do it by either dragging them into the browser window or clicking the "+" icon.
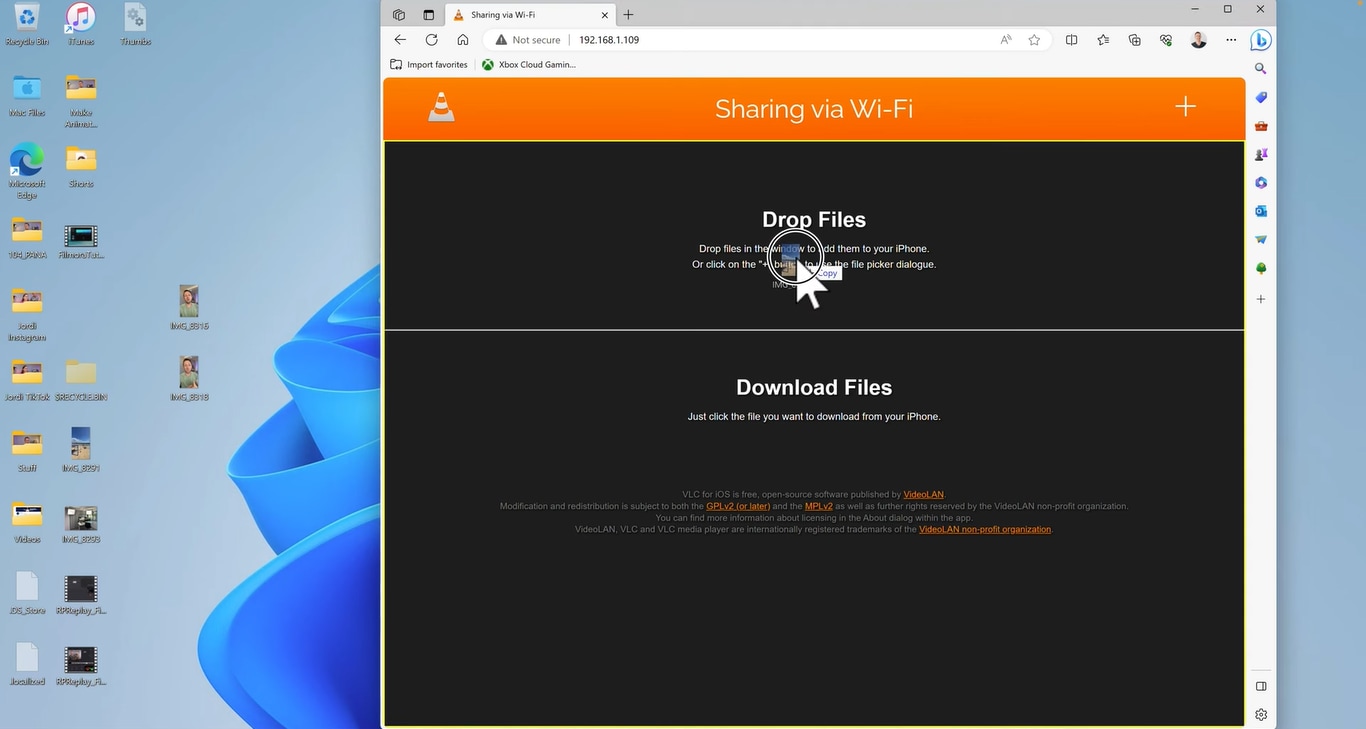
Step 4 Once you add the files, the transfer process will begin automatically. Wait for the transfer to complete.
After the transfer, you can access the videos in the VLC app on your iPad.
All the above methods used a physical connection or some third-party tool. But, how to send a video from iPhone to iPad without using these things? You can then rely on the cloud services of iOS.
Part 4. How to Transfer Videos from Computer to iPad with iCloud?
Using iCloud to transfer videos from a computer to an iPad is also a wireless method. iCloud allows for the syncing of files across all devices Image nameed to your Apple ID. This method is useful if you regularly use Apple products and have a consistent internet connection.
The advantage of using iCloud is its convenience. It automatically syncs your photos and videos across all your devices.
The downside is that you have to depend on iCloud storage space. You require a subscription if your storage needs exceed the free limit of 5Gb data.
Here’s a stepwise guide to transfer films to iPad using iCloud.
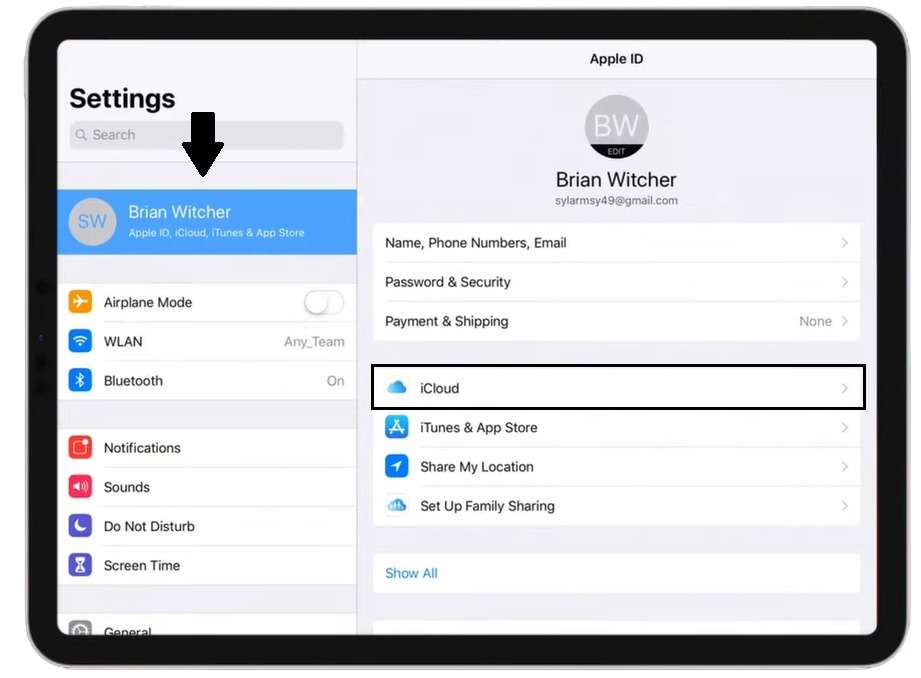
Step 1 Open the Settings app on your iPad. Tap on the Apple ID and then select “iCloud.” Make sure “iCloud Drive” is turned on.
Step 2 On your computer, open a web browser and go to the iCloud website. Sign in using the same Apple ID you use on your iPad.
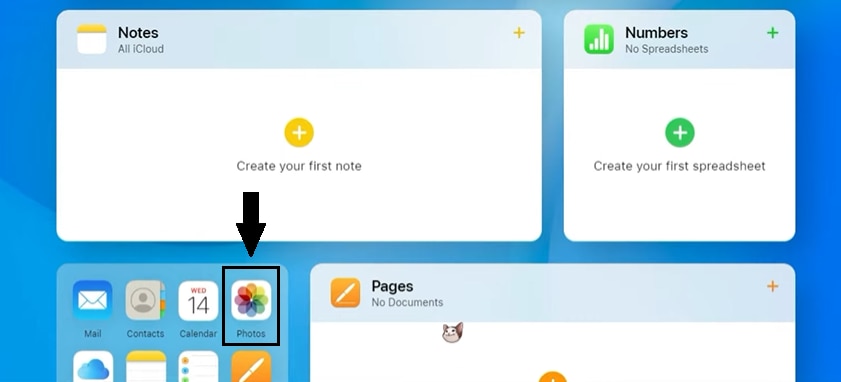
Step 3 Once logged in, click on “Photos.” Here, you can upload your videos.
Step 4 Select the video files from your computer that you wish to transfer to your iPad. Click on the “Upload” button. You can also drag and drop the videos in this section.
Step 5 Once the upload is complete, open the “Files” app on your iPad. Tap on “Browse” at the bottom, then select “iCloud Drive.” You should see the videos you uploaded.
Now, Google also provides a cloud service. Surprisingly, you can use Google Drive to get videos on your iPad. Let’s show you how to transfer movie from PC to iPad with Google Drive as our last method.
Part 5. How to Transfer Videos from Computer to iPad with Google Drive?
Transferring videos from some PC to an iPad using Google Drive is another efficient method. Google Drive allows you to store various files, including videos. You can then access the files from any device with internet connectivity.
Additionally, it's a great option for saving storage space on your iPad. It’s because you can keep the videos in the cloud rather than downloading them to your device.
Let’s see how to transfer video from Android to iPad in a stepwise manner.
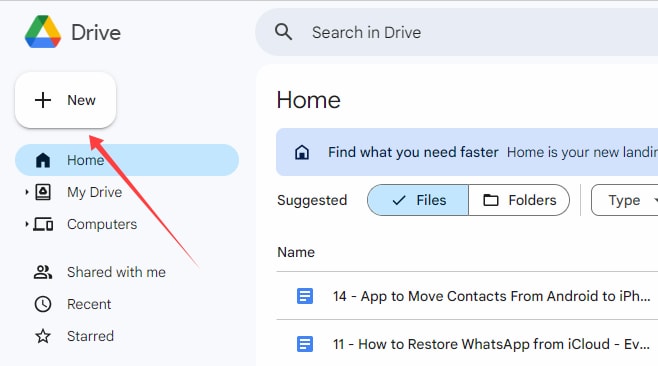
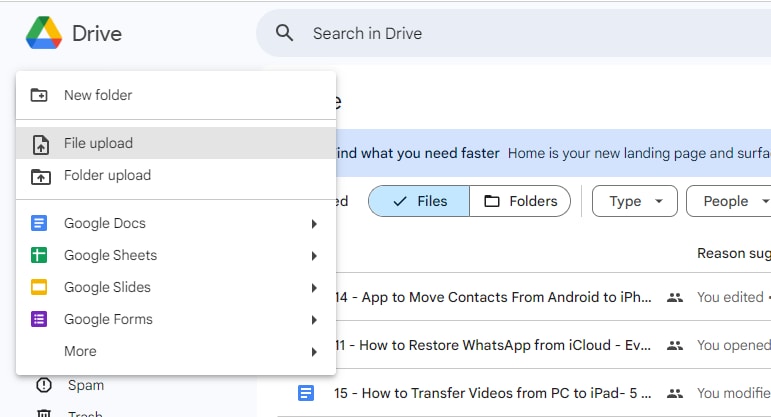
Step 1 Open Google Drive in the web browser or download it. Sign in with your Google (Gmail) account. Click on the “New” button. and choose “File Upload.”
Step 2 Select “File Upload” and choose the video files you want to upload from your computer. After selecting the videos, wait for them to upload completely.
Step 3 On your iPad, go to the App Store and download the Google Drive app. Open the app and sign in with the same Google account you used on your computer.
Step 4 You will see all the files and folders from your Google Drive account. Locate the videos you uploaded. You can now open and view them directly in the app.
Step 5 If you wish to access these videos offline, tap on the three dots next to the file. Now choose the “Make available offline” option.
The video will be downloaded to your iPad for offline viewing.
Conclusion
Transferring your videos from a PC to your iPad could be as easy as pie! With the various methods we've shown, you now know exactly how to transfer videos from PC to iPad. Whether you use Dr.Fone, VLC, iCloud, or anything else, you have many options.
Each method covers different needs and preferences. Remember, Dr.Fone is a software that can be used for any data management task for Android or iOS devices.


iPad Tips & Tricks
- Make Use of iPad
- iPad Tips and Tricks
- Smart Keyboard Folio VS. Magic Keyboard
- iPad Photo Transfer
- Transfer Music from iPad to iTunes
- Transfer Purchased Items from iPad to iTunes
- Delete iPad Duplicate Photos
- Download Music on iPad
- Use iPad as External Drive
- Transfer Data to iPad
- Transfer Photos from Computer to iPad
- Transfer MP4 to iPad
- Transfer Files from PC to iPad
- Transfer Photos from Mac to iPad
- Transfer Apps from iPad to iPad/iPhone
- Transfer Videos to iPad without iTunes
- Transfer Notes from iPhone to iPad
- Sync iPhone to iPad
- Transfer Photos from Android to iPad
- Transfer iPad Data to PC/Mac
- Transfer Photos from iPad to Mac
- Transfer Photos from iPad to PC
- Transfer Books from iPad to Computer
- Transfer Apps from iPad to Computer
- Transfer Music from iPad to Computer
- Transfer PDF from iPad to PC
- Transfer Notes from iPad to Computer
- Transfer Files from iPad to PC
- Transfer Videos from iPad to Mac
- Transfer Videos from iPad to PC
- Sync iPad to New Computer
- Transfer iPad Data to External Storage
James Davis
staff Editor