How to Export iTunes Playlist with Music Files

Jan 11, 2024 • Filed to: Manage Device Data • Proven solutions
Most of the times a user need to transfer or export a playlist due to the fact that it requires sharing with others so that they never have to go through the same hectic process of searching and gathering songs as the user did. If a playlist has been gathered keeping in mind any special occasion then it is definitely priceless and the user transfers it to others to make sure that they can also play and enjoy it on an occasion that is of similar genre. The iTunes playlist is also transferred to the other devices to make sure that it is kept safe and secure and nobody can access it due to the awesome collection of songs that are there in it. This tutorial has been written keeping in view the needs and requirements of the users when it comes to iTunes playlist export.
- Part 1. Export iTunes Playlist with Music Files via iTunes
- Part 2. Export Playlists from iTunes to Text
- Part 3. Export iTunes Playlists to iPhone/iPad/iPod
- Part 4. Sync iTunes Playlists to iOS Devices without Erasing the Original Playlists
Part 1. Export iTunes Playlist with Music Files via iTunes
It is a simple process that requires a user to only be a good user of the iTunes program and the rest is all done in a blink of an eye. To make the process simple, the user needs to make sure that the steps that are presented here in this tutorial are followed step by step. Then the user can enjoy the iTunes playlists that he has created. Following are some simple steps involved:
i. As a first step, the user needs to make sure that the iTunes software is launched.

ii. From the current iTunes session, it is advised to click the Playlists option to make sure that the process continues.

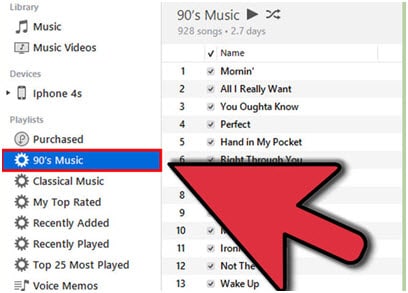
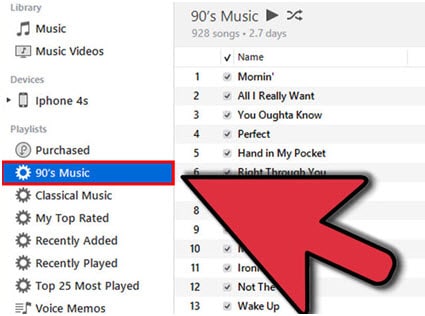
iii. On the left software panel, the user needs to select the playlist that is to be exported.
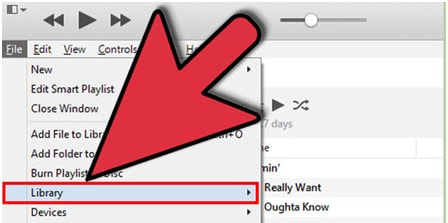
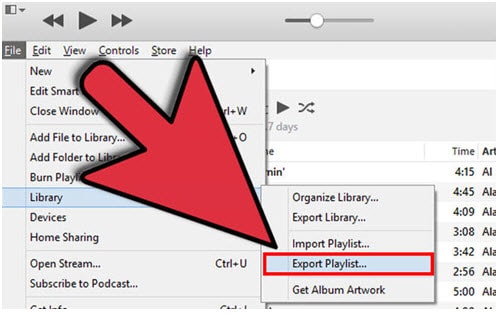
iv. Now the user needs to follow the path File > Library.
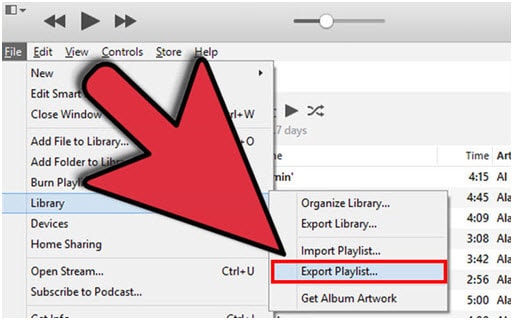
v. Then Choose "Export Playlist..." option from the drop down list as it has been highlighted.
vi. In the pop-up windows that opens the user needs to make sure that the file type is selected as XML files against the “Save as type”. This will also complete the process in full.

Watch Video Tutorial on How to Export iTunes Playlist with Music Files via iTunes
Part 2. Export Playlists from iTunes to Text
The process of saving iTunes to text is fairly simple and it is almost similar to the one that has been mentioned above. The only difference is to make sure that the "Save as type" is changed to text in the last step. For the user’s convenience, the process is however repeated to avoid any inconvenience and confusion:
i. Launch iTunes.

ii. Click Playlists on the main bar when the current session is being played.
iii. The playlist to be exported is to be clicked on the left panel of the iTunes.
iv. Click File > Library > Export Playlist...
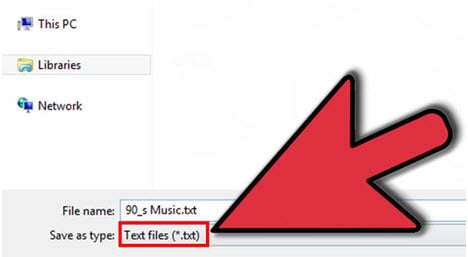
v. From the next window that pops up, the user needs to make sure that the “Save as type” is selected to text. If the format is demanded by the system the UTF -8 is to be selected. Hit save and complete the process.
Part 3. Export iTunes Playlists to iPhone/iPad/iPod
It is the simplest process which makes life easier for many users and hence they resolve this issue by simple connecting their device to the computer and transferring the content to the new iDevice as per their requirements. To make it simpler, this tutorial will now enlighten the users regarding the iTunes playlist export to iPhone and other iDevices will be the similar steps.
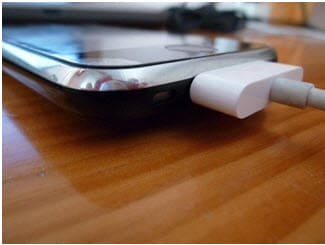
i. The user needs to connect the Apple’s device to computer through a USB cable to start the process.
ii. Once it has been done, the user needs to make sure that the iExplorer is then launched on Mac or PC whatever the genre of the machine is.
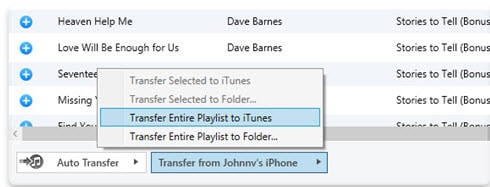
iii. The iExplorer detects the device and will display its contents. To view the music, the user needs to click the Music option on the left panel and then the relevant playlist.

iv. Now the user needs to follow Transfer > Transfer Entire Playlist to iTunes path to move forward to ensure that the process is continued smoothly and without any hassle.
v. To complete the process, the user needs to close and restart the iTunes software and then to make sure that the target device is connected to the same PC and the iTunes are synced with it, so that the new playlist is transferred to the new device without any issue.
Part 4. Sync iTunes Playlists to iOS Devices without Erasing the Original Playlists
As we know, when the user syncs the playlists to the other iDevices with iTunes, the old playlists will be deleted instantly. It is something which worries a user a lot due to the fact that almost everyone wants to keep the old playlists in its original place. To make sure that the issue is never faced, it is advised to download and install Dr.Fone - Phone Manager (iOS) which is a wonderful program developed by Wondershare. You can easily transfer new playlist to iOS devices with the orignal playlists kept as well.
Dr.Fone - Phone Manager (iOS)
Transfer new playlist to iOS devices without Erasing the Original Playlists
- Transfer, manage, export/import your music, photos, videos, contacts, SMS, Apps etc.
- Backup your music, photos, videos, contacts, SMS, Apps etc. to computer and restore them easily.
- Transfer music, photos, videos, contacts, messages, etc from one smartphone to another.
- Transfer media files between iOS devices and iTunes.
- Fully compatible with iOS 7, iOS 8, iOS 9, iOS 10, iOS 11 and iPod.


Step 1 The program is to be downloaded from https://drfone.wondershare.com/iphone-transfer.html as the latest version is always there to support the need of the users. Once it has been downloaded, install and launch it. Connect the iDevice with the computer with the USB cable.
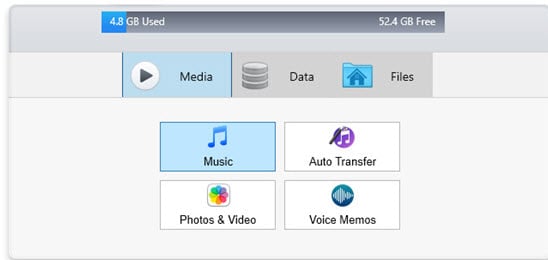
Step 2 The user then needs to click on the option of "Phone Manager" from Dr.Fone interface, a new windows pops up.


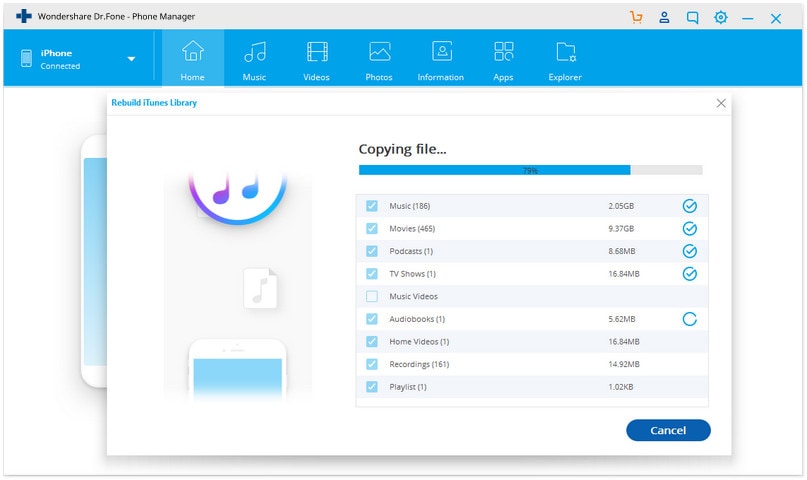
Step 3 Click on "Transfer iTunes Media to Device", all the iTunes music library will be checked by default, uncheck the itmes you won't transfer. Click Transfer to start transferring the selected playlist. And click OK after the transfer completes.
Video Tutorial: Sync iTunes Playlists to iOS Devices with Dr.Fone - Phone Manager (iOS)


iTunes Manage
- iTunes Backup
- 1. Does iTunes Backup Photos
- 2. Forgot iTunes Backup Password
- 3. Fix iTunes Corrupt Backup
- 4. Fix iTunes Backup Session Failed
- 5. Change iTunes Backup Location
- 6. View Files on iTunes Backup
- 7. Backup WhatsApp Using iTunes
- 8. Top 5 iTunes Backup Managers
- 9. Top 6 Free iTunes Backup Extractor
- 10. Backup iMessage Without iTunes
- iTunes Restore
- 1. Restore Photos from iTunes Backup
- 2. Restore Data from iTunes Backup
- 3. Restore WhatsApp Using iTunes
- iTunes Rebuild
- 1. Transfer iPad Purchases to iTunes
- 2. Transfer iPad Music to iTunes
- 3. Transfer iPod Music to iTunes
- 4. Transfer Android Music to iTunes
- 5. Import Multiple Lyrics to iTunes
- iTunes Transfer
- 1. Sync iTunes Media to iCloud
- 2. Sync iTunes Media to Android
- 3. Transfer iTunes Music to iPod
- 4. Transfer iTunes Music to Flash Drive
- 5. Transfer iTunes Music to Android
- 6. Transfer iTunes Music to Google Play
- 7. Put iTunes Audiobooks to Android
- 8. Copy iTunes Playlists to Hard Drive
- 9. Move iTunes Library to PC / Mac
- 10. Export iPhone Contacts from iTunes
- 11. Export Playlist from iTunes
- iTunes Plugins/Alternatives
- 1. Top 3 iTunes Plugins
- 2. Top 20 Alternatives to iTunes
- 3. Top 3 iTunes Alternatives for Android
- 4. Top 5 iTunes Remote for Android
- iTunes Problems
- 1. Fix iTunes Error 11
- 2. Fix iTunes Error 1100
- 3. Fix iTunes Error 2005/2003
- 4. Locked Out Of iTunes
- 5. Forgot iTunes Password
- 6. Account Has Been Disabled in iTunes
- iTunes Tricks
- 1. Change the iTunes Skin
- 2. Use File Sharing in iTunes
- 3. Use Home Sharing in iTunes
- 4. Recover iPhone Data from iTunes
- 5. See iTunes Purchase History
- 6. Get Free iTunes Cards Legally
- 7. iTunes Visualizers Download
- 8. Watch iTunes Movie on Android
- 9. Update iTunes On Your Computer
- 10. Install iTunes on Windows / Mac
- ● Manage/transfer/recover data
- ● Unlock screen/activate/FRP lock
- ● Fix most iOS and Android issues
- Manage Now Manage Now Manage Now
Daisy Raines
staff Editor