6 Proven Solutions to Transfer Photos from iPhone to Mac

Mar 08, 2024 • Filed to: Manage Device Data • Proven solutions
.There can be ample reasons for the need to transfer your iPhone photos to Mac. For example, lack of space on the iPhone, changing your iPhone with a new one, exchanging, or even selling it. No matter what situation you are in, you do need a full-proof method to process the transfer of photos from an iPhone to a Mac. Might you not want to lose even a single memory of yours locked in the photos, right? So, here we are with 6 proven methods that will help you transfer photos from iPhone to Mac the right way and without losing any data.
- Part 1: Transfer Photos From iPhone to Mac Using Dr.Fone (Mac) - Phone Manager (iOS)
- Part 2: Import photos from iPhone to Mac using iPhoto
- Part 3: Transfer photos from iPhone to Mac using AirDrop
- Part 4: Import photos from iPhone to Mac using iCloud Photo Stream
- Part 5: Transfer photos from iPhone to Mac using iCloud Photo Library
- Part 6: Download photos from iPhone to Mac using Preview
Part 1: Transfer Photos From iPhone to Mac Using Dr.Fone (Mac) - Phone Manager (iOS)
One of the best iPhone toolkit available in the open app market is the Dr.Fone. This software is not just a tool to copy photos from iPhone to Mac. It is useful for much more than that, and it is like a box of iPhone tools. Apart from the fact that the software has a user-friendly yet attractive interface with zero complexity for users, it also provides maximum control over your iPhone. Dr.Fone can be used to recover lost data from an iPhone. It can serve as an easy backup and restore or erase tool. It can transfer photos from an iPhone to Mac or transfer files from an old iPhone to a new one. It is also capable of removing the lock screen on an iPhone, repair any iOS system-related issues and even root your iPhone. Dr.Fone - Phone Manager (iOS) is also a useful tool to transfer photos from iPhone to Mac without using iTunes.
Dr.Fone - Phone Manager (iOS)
Transfer Photos from iPhone/iPad to Mac without iTunes
- Transfer, manage, export/import your music, photos, videos, contacts, SMS, Apps, etc.
- Backup your music, photos, videos, contacts, SMS, Apps, etc. to computer and restore them quickly.
- Transfer music, photos, videos, contacts, messages, etc. from one smartphone to another.
- Transfer media files between iOS devices and iTunes.
- Fully compatible with iOS 7 to iOS 13 and iPod.


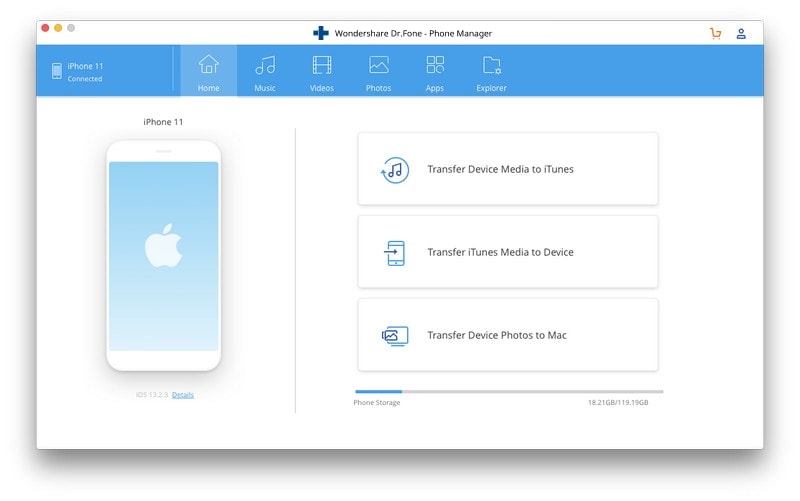
1. Download the Mac version of Dr.Fone software. Install the software on your Mac and launch it. Then choose "Phone Manager" from the main interface.
2. Using a USB cable, connect your iPhone to the Mac. Once your iPhone is connected, click on “Transfer Device Photos to Mac” This can help you transfer all photos on your iPhone to Mac with one click.
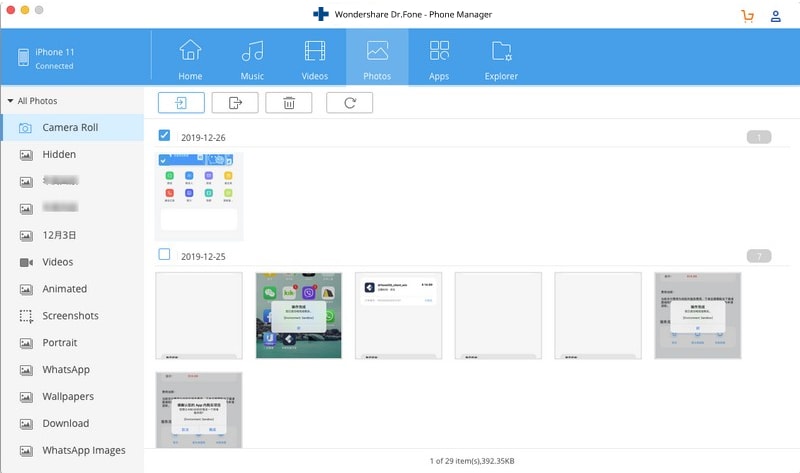
3. There is another way to transfer photos from your iPhone to Mac selectively with Dr.Fone. Go to the Photos tab on the top. Dr.Fone will display all your iPhone photos in different folders. Select the images you want and click the Export button.
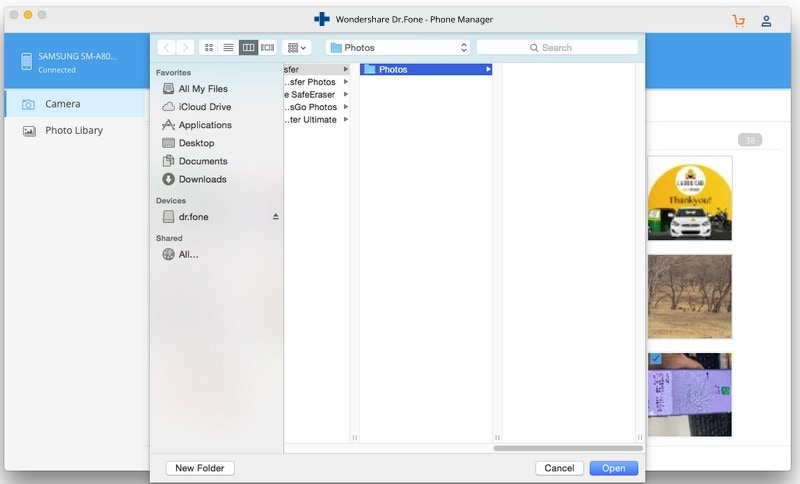
4. Then choose a save path on your Mac to save the exported iPhone photos.
Part 2: Import photos from iPhone to Mac using iPhoto
iPhoto might be another software that iPhone users often use to copy photos from iPhone to Mac as an easy alternative to the complicated iTunes even though it is restricted to copying photos that relocated in the camera roll folder of your device. iPhoto is often preinstalled on Mac OS X, and there might be no need to download and install iPhoto. Below are steps on how to transfer photos from iPhone to Mac using iPhoto.
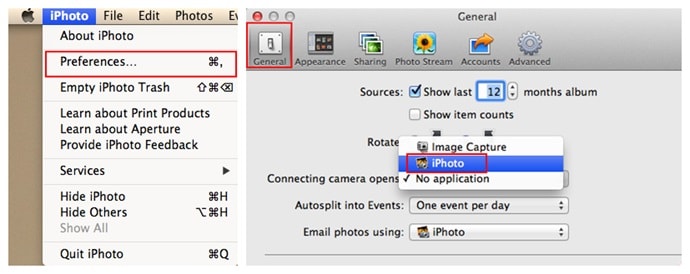
1. Connect your iPhone to Mac with a USB cable, iPhoto should automatically launch displaying photos and videos from the iPhone device. If iPhoto does not launch automatically, launch it and click on “Preferences” from the “iPhoto” menu and then click “general setting” then change “Connecting Camera Opens” to iPhoto.
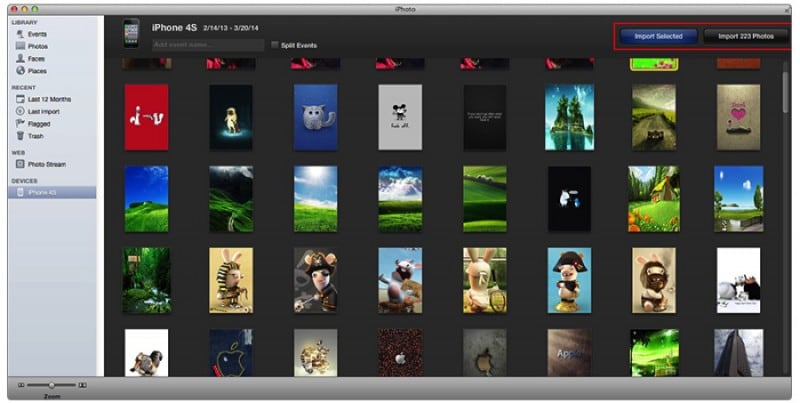
2. Once photos from your iPhone have been displayed, select the photos to be imported and hit “import selected” or just import all.
Part 3: Transfer photos from iPhone to Mac using AirDrop
Airdrop is another one of the Apple-provided applications that can be used to transfer photos from iPhone to Mac. This software became available for use from iOS 7 upgrade as a means for users to share files between iOS devices, including to import photos from iPhone to Mac.

1. On your iPhone device, go to Settings and turn on the Wi-Fi and Bluetooth as well. On the Mac, switch on the Wi-Fi by clicking on the Menu bar to turn Wi-Fi on. Turn on the Bluetooth of the Mac also.
2. On your iPhone, slide up to view “Control center”, then click on “Airdrop”. Select “Everyone” or “Contacts Only”
3. On the Mac, click on the Finder and then select “Airdrop” from the “Go” option under the Menu bar. Click on “Allow me to be discovered” and choose either “Everyone” or “Contact Only” just as chosen on the iPhone to be shared.
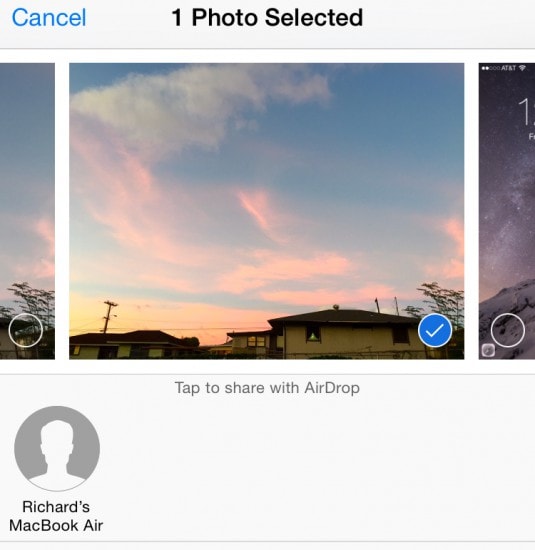
4. Go to where the photo to be copied to Mac is located on the iPhone, select the photo, or select multiple photos.
5. Tap the Share option on your iPhone, then select “ tap to share with Airdrop” and then select the name of the Mac to be transferred to. On the Mac, a prompt to accept the sent file would be displayed, click on accept.
Part 4: Import photos from iPhone to Mac using iCloud Photo Stream
iCloud Photo Stream is an Apple iCloud feature in which photos are shared to an iCloud account and can be gotten on another Apple device at any time. Below are steps on how to import photos from iPhone to Mac using iCloud Photo Stream:
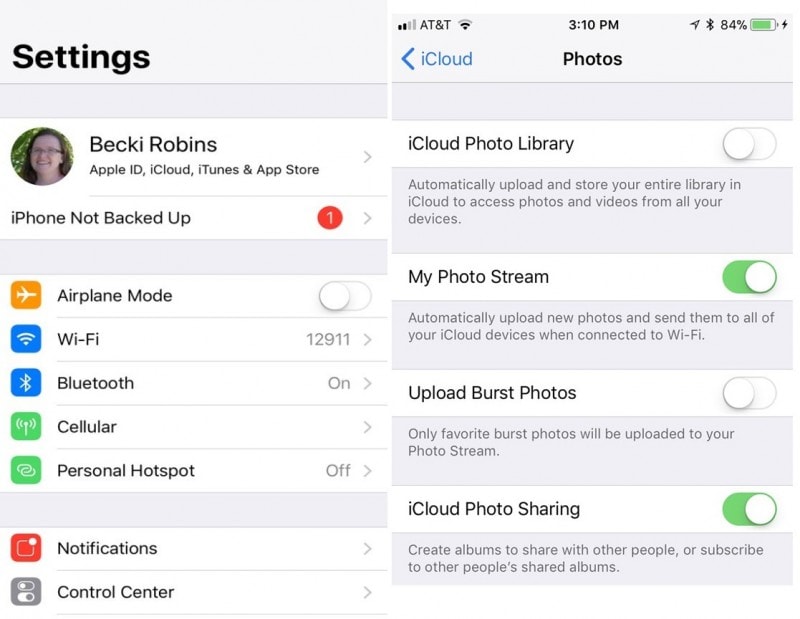
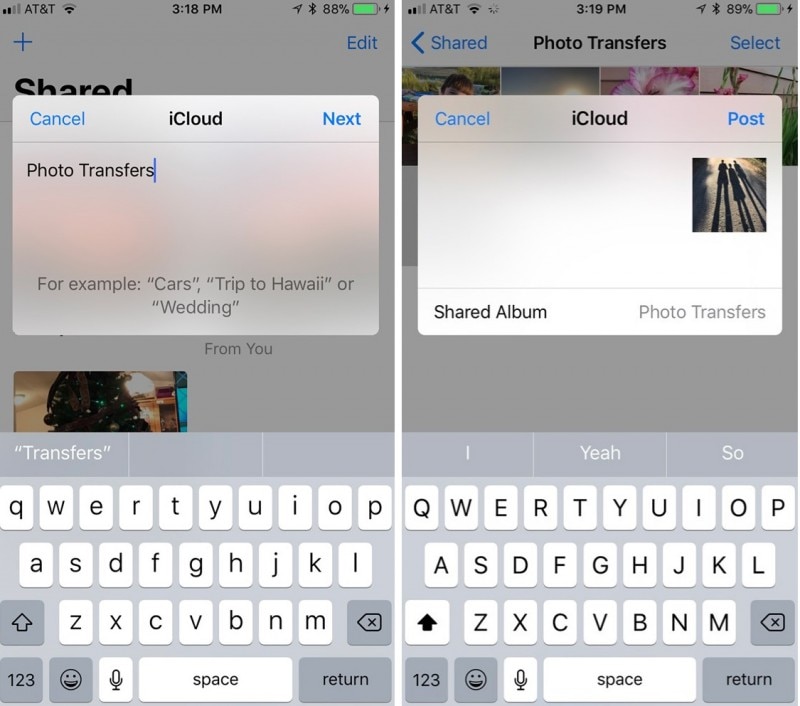
1. Go to Settings on your iPhone and click on your Apple ID or name. On the next screen, tap on iCloud and check “My Photo Stream” under Photos option
2. Create a shared folder from the Photo app and click on Next. In the newly created album folder, click on the “+” sign to add photos to that album and then select “Post”.
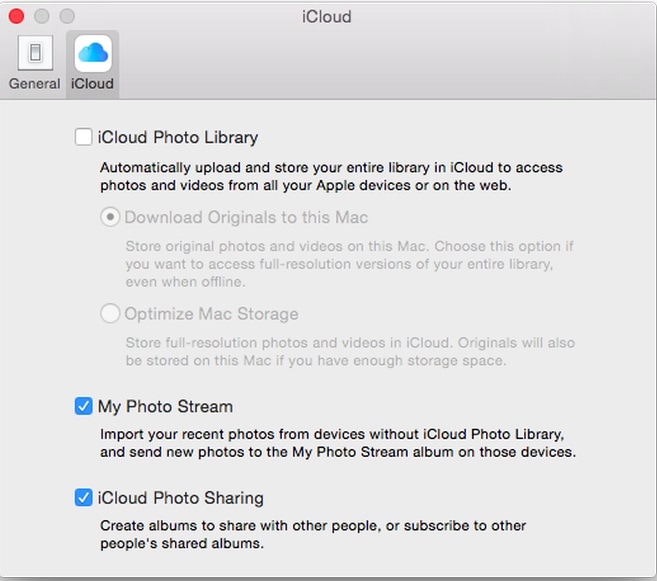
3. On your Mac, open Photos and click on the “Photos” tab and then click on “Preferences. Select iCloud to bring a settings window. Make sure the “My Photostream” option is checked.
4. On the “My Photostream” screen, albums that have been created can be seen and easily accessed and copied to your Mac storage.

Part 5: Transfer photos from iPhone to Mac using iCloud Photo Library
iCloud Photo Library is similar to iCloud Photo Stream, and there is only a slight difference between the two is that iCloud Photo Library uploads all photos on your device to iCloud.
1. Go to Settings on your iPhone, click on your Apple Id or name, click on iCloud and check “iCloud Photo Library”. All your photos would start uploading to your iCloud account servers.
2. On your Mac, launch Photos and click on the photos tab. Click on preferences from the Options Menu and then select the “iCloud” option.
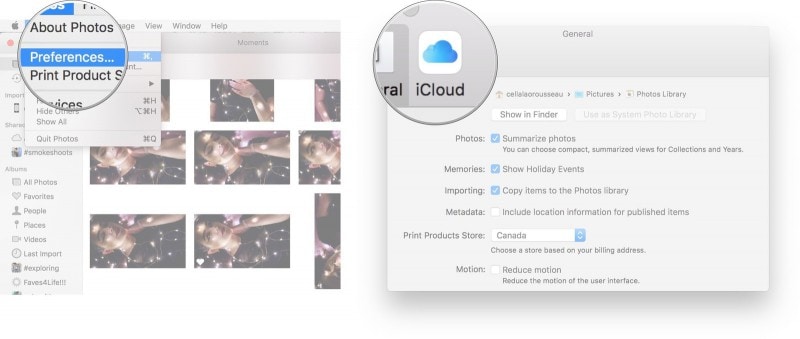
3. On the new window, check the “iCloud Photo Library” option. You can now view all uploaded photos on your Mac and choose to Download.

Part 6: Download photos from iPhone to Mac using Preview
Preview is another inbuilt application in Mac OS that can be used to import photos from iPhone to Mac
1. Plugin your iPhone to your Mac with a USB cable.
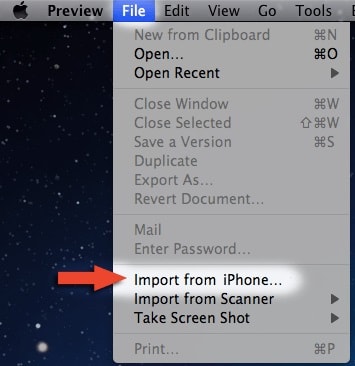
2. Launch Preview software on Mac and select “Import from iPhone” under the file menu.
3. All photos on your iPhone would be displayed to be chosen from or click on “Import all.”

A new pop-up window would request a destination location to import the photos too, navigate to the desired location, and hit “choose destination”. Your images would be immediately imported.
There is a hand full of methods, and ways to copy photos from iPhone to Mac, and all are readily available. It is always best to back up your device photos from time to time in other to preserve pictorial memories which, if lost, might be difficult to get back. Of all these methods Dr.Fone - Phone Manager (iOS) is best recommended for its flexibility and zero restriction to transfer photos from iPhone to Mac.


iPhone Photos
- Convert HEIC to JPG
- 1. Convert HEIC to JPG on Linux
- 2. Convert HEIC to JPG Windows
- 3. Best HEIC Converter Online
- 4. Convert HEIC to JPG High Quality
- Export iPhone Photos
- 1. Upload iPhone Photos to Google Drive
- 2. Transfer Photo from iPhone to PC
- 3. Transfer Photo from iPhone to iPhone
- 4. Transfer from iPhone to iPhone
- 5. Transfer from iPhone to iPad
- 6. Move iPhone Photo to External Drive
- 7. Transfer from iPhone to Flash Drive
- 8. Extract Photos from iPhone
- 9. Download Photo from iPhone
- Import Photos to iPhone
- 1. Transfer from Laptop to iPhone
- 2. Transfer Photo from Camera to iPhone
- 3. Transfer Photo from Mac to iPhone
- 4. Transfer Photos from PC to iPhone
- 5. Transfer from iPhone to PC
- 6. Transfer from Android to iPhone
- 7. Transfer from Samsung to iPhone
- Manage iPhone Photos
- 1. Back up iPhone Photos
- 2. Get Photos off iPhone
- 3. Send Large Size Photos from iPhone
- 4. Photo/Video Compressor Apps
- 5. Delete Photos from iPhone/iPad
- 6. iPhone Photos Disappeared Suddenly
- 7. iPhone Photoshop Alternatives
- Recover iPhone Photos
- 1. Restore Deleted Photos from iPhone
- 2. Recover Photos from iPod Touch
- 3. Recover Deleted Picture from iPhone
- Transfer iPhone Photos to Mac
- Transfer iPhone Photos to PC
- 1. Transfer Data from iPhone to PC
- 2. Transfer Photo to Computer
- 3. Transfer Photo to PC without iTunes
- 4. Transfer Library to Computer
- 5. Send Photo from iPhone to Computer
- 6. Import Photo from iPhone to Windows
- 7. Transfer Photo to Windows
- Transfer Photos from Google Drive
- 1. Download from Google Drive to iPhone
- 2. Transfer from Google Photo to iPhone
- 3. Download from iCloud to iPhone
- Transfer Photos to Google Drive
- Image Convert Tips
- ● Manage/transfer/recover data
- ● Unlock screen/activate/FRP lock
- ● Fix most iOS and Android issues
- Learn More Learn More
Alice MJ
staff Editor