How to Root Galaxy Tab 2 7.0 P3100/P3110/P3113 Using CF-Auto-Root

Sep 01, 2023 • Filed to: Latest News & Tactics • Proven solutions
Preparations Before Rooting
Before rooting Galaxy Tab 2 7.0 P3100/P3110/P3113, please make sure this before you start:
1) You have more than 80% battery on your device.
2) You have backed up the important data on your device. Check how to backup Android files to PC.
3) You accept it that rooting will void your warranty.
How to Root Galaxy Tab 2 7.0 P3100/P3110/P3113 Using CF-Auto-Root Manually
This tutorial is only for devices below:
Samsung Galaxy Tab 2 7.0 P3100
Samsung Galaxy Tab 2 7.0 P3110
Samsung Galaxy Tab 2 7.0 P3113
If you don't use any of them, don't follow this guide to root your device. Or it will be damaged. Just search for another guide suitable for it.
Download Android Root tools for the rooting process
1. Download the CF-Auto-Root package below for your device.
CF-Auto-Root-espressorf-espressorfxx-gtp3100.zip (for P3100)
CF-Auto-Root-espressowifi-espressowifiue-gtp3113.zip (for P3113)
CF-Auto-Root-espressowifi-espressowifixx-gtp3110.zip (for P3110)
Step 1. Extract the CF-Auto-Root file and you'll see a .tar file. Leave it alone and go to the next step.
Step 2. Extract the Odin3 file, and then you'll see a .exe file. Double click to run it on your computer.
Step 3. Tick off the box in front of PDA on the window of Odin3, and then browse to select the .tar file and load it in.
Step 4. Then check the boxes of Auto-Reboot and F.Reset Time, leaving the Re-Partition box unchecked.
Step 5. Now Switch off your device. Then press the Power + Volume Down buttons together for about a few seconds until you see the warning message appearing on the screen, and then press the Volume Down button. Wait till your device is restarting in Download mode.
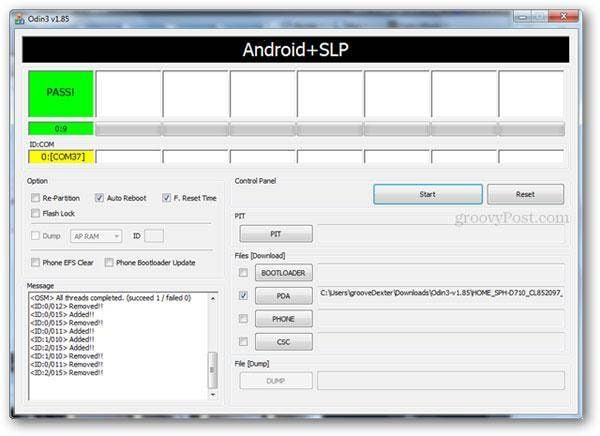
Step 6. Get your device connected to the computer with a USB cable. When the Odin3 detects your device, you'll see a yellow-highlighted port under the ID:COM. Then move forward.
Note: If you didn't see the yellow-highlighted port, you should install the USB drivers for your device.
Step 7. Click the Start button in the Odin3 to begin rooting your device now. Don't disconnect your device during this process. It will cost you a little while. When it completes, you can see a PASS! message on the window. Then your device will restart by itself, and the whole rooting process is over. You're free to do whatever you want now.


Samsung Manage
- Samsung Data Manage
- 1. Best Samsung Manager
- 2. Manage Contacts on S9/S8
- 3. Manage Music on Samsung
- 4. Manage Music on Samsung S8
- 5. Transfer Photos to Samsung S8
- 6. Manage Photos on Samsung S9
- 7. Best Galaxy S9 Manager
- 8. Samsung Gear Manager
- 9. Samsung Task Manager
- 10. Remove Samsung Bloatware
- Samsung Erase
- 1. Tips for Selling Old Samsung
- 2. Wipe A Samsung Phone
- 3. Tips to Erase Data
- 4. Remove Samsung Apps
- 5. Uninstall Apps on Samsung
- Samsung Mirror
- 1. Share the Phone Screen
- 2. Screen mirror to Samsung TV
- 3. Use Allshare Cast To Mirror
- 4. Samsung Mirror Screen to PC
- Samsung Record
- 1. Screen Record on Samsung A50
- 2. Screen Record on Samsung S10
- 3. Screen Record on Samsung s9
- 4. Samsung S8 Screen Record
- 5. Top Samsung Screen Recorder
- Samsung Root
- 1. Root Samsung Galaxy S7
- 2. Jailbreak Samsung Phones
- 3. Root Samsung Galaxy S3
- 4. Root Samsung Galaxy S4
- 5. Root Samsung Galaxy S5
- 6. Root Samsung Galaxy J5
- 7. Samsung Root Apps Without PC
- 8. Top 6 Samsung Root Software
- 9. Used Apps to Root Samsung Note
- 10. Root Samsung Galaxy S3 mini
- 11. Root Galaxy Tab 2 7.0
- 12. Unroot Android Devices
- Samsung to Mac
- 1. Transfer Photos to Mac
- 2. Samsung File Transfer for Mac
- 3. Transfer Photos from Samsung
- 4. Transfer Pictures to Mac
- 5. Transfer Pictures from Samsung
- 6. Transfer Files to Macbook
- Samsung to PC
- 1. Transfer Contact from Samsung
- 2. Transfer Photos to PC
- 3. Transfer Photos to Laptop
- 4. Transfer Photos from Samsung
- 5. Transfer Files to PC
- 6. Transfer Photos From Note 8 to PC
- USB Debugging
- Samsung Tips
- ● Manage/transfer/recover data
- ● Unlock screen/activate/FRP lock
- ● Fix most iOS and Android issues
- Manage Now Manage Now Manage Now
James Davis
staff Editor