How to Transfer & Backup iPhone SMS/iMessage Conversation to PC/Mac

Mar 08, 2024 • Filed to: Manage Device Data • Proven solutions
I want to save iMessage history including attachments on my iPhone to the computer, so that I can copy or send it to my Email. Is it possible? I use iPhone 7, iOS 11. Thanks:)
Still save iMessage from iPhone to PC or Mac by making a screenshot of it? Stop it now. The great way to save iMessage on iPhone is saving it as a readable and editable file, not a picture. You can't do it before, but you can do it now. With an iMessage export tool, it's a simple work.
- Part 1: How to Save iPhone SMS and iMessages to PC or Mac with Dr.Fone - Phone Backup (iOS)
- Part 2: Save SMS & iMessages from iPhone to Compuer with Dr.Fone - Phone Manager (iOS)
- Part 3: Backup iPhone SMS/iMessages to Compuer with iTunes
Part 1: How to Save iPhone SMS and iMessages to PC or Mac with Dr.Fone - Phone Backup (iOS)
Don't know where to find an iMessage exporting tool? Have one of my best recommendations here: Dr.Fone - Phone Backup (iOS). With it, you can fully scan and save iMessages conversions from your iPhone.
Dr.Fone - Phone Backup (iOS)
Backup & Restore iOS Data Turns Flexible.
- One click to backup the whole iOS device to your computer.
- Allow to preview and restore any item from the backup to a device.
- Export what you want from the backup to your computer.
- Selectively backup and restore any data you want.
- Trusted by millions of users around the world and has received rave reviews.
- Supports ALL models of iPhone, iPad and iPod touch.
- Supports iPhone 15/14/13/12/11/X and the latest iOS version fully!


How to Transfer and Backup iPhone SMS Message from iPhone to PC
Step 1. Connect your iPhone to the computer
You will want to start by downloading and install Dr.Fone - Phone Backup (iOS). Once that has been taken care of, connect your iPhone to one of your computer's available USB ports using your phone's charging cable. Run the program and from the main window, choose "Phone Backup".

Step 2. Scan for iMessages on your device
The software will then look for your iPhone. Once it detects your iPhone, it will display all of the different file types available for your to backup or export to your PC. Since we want to backup iPhone messages to pc as well as backup iMessages to pc, we will choose "Messages & Attachments" and then we'll click "Backup" to continue. Keep your iPhone connected during the whole process as it will take some time.

Step 3. Preview and save iMessage history to your computer
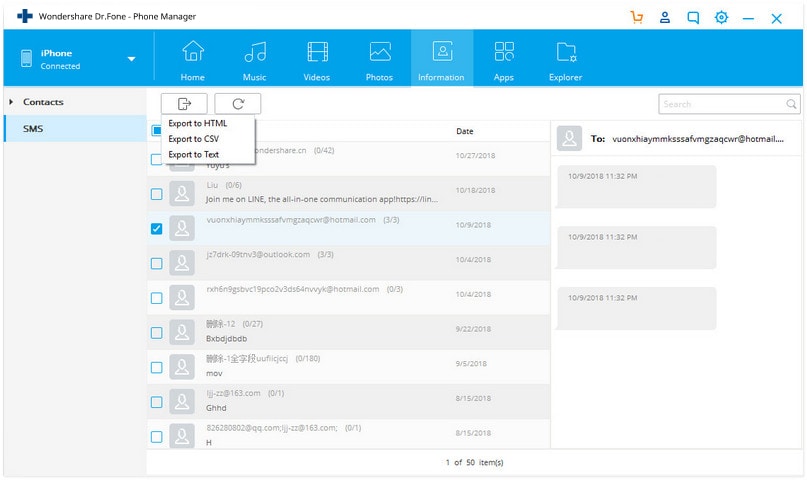
Once the backup process is complete, you'll see all of the data in the backup file as shown below. The power of this tool is your ability to customize how much, or how little, you send to your PC. Choose what you would like to include and then click the “Export to PC” button. It will create an HTML file of your selected content on your computer.

Dr.Fone - Phone Backup (iOS) – the original phone tool – working to help you since 2003
Join millions of users who have recognized Dr.Fone - Phone Backup (iOS) as the best tool.
Part 2: Save SMS & iMessages from iPhone to Compuer with Dr.Fone - Phone Manager (iOS)
The second option I want to show you is Dr.Fone - Phone Manager (iOS) . Dr.Fone - Phone Manager (iOS) is another slick piece software that will allow us to backup iMessages to pc and/or backup iPhone messages to pc. The feature of the software that impressed me the most was how you could transfer all iMessages and SMS messages in one click.
Dr.Fone - Phone Manager (iOS)
Saves SMS & iMessages from iPhone to Compuer in One Click!
- Transfers SMS, iMessages, photos, contacts, videos, music and more from iPhone to PC or Mac.
- Supports iPhone X / 8 (Plus)/ iPhone 7(Plus)/ iPhone6s(Plus), iPhone SE and the latest iOS version fully!
- Fully compatible with Windows 10 or Mac 14.
- Supports any iOS versions completely.
How to backup iPhone messages to pc and backup iMessages to pc in one click
Step 1. Select "Back Up Your Phone" feature
Start off by downloading and installing Dr.Fone - Phone Manager (iOS). Once installed, connect your iPhone to one of your computer's available USB ports using the phones charging cable. Click on the option of "Phone Manager" from Dr.Fone interface.

Step 2. Select iPhone data to transfer
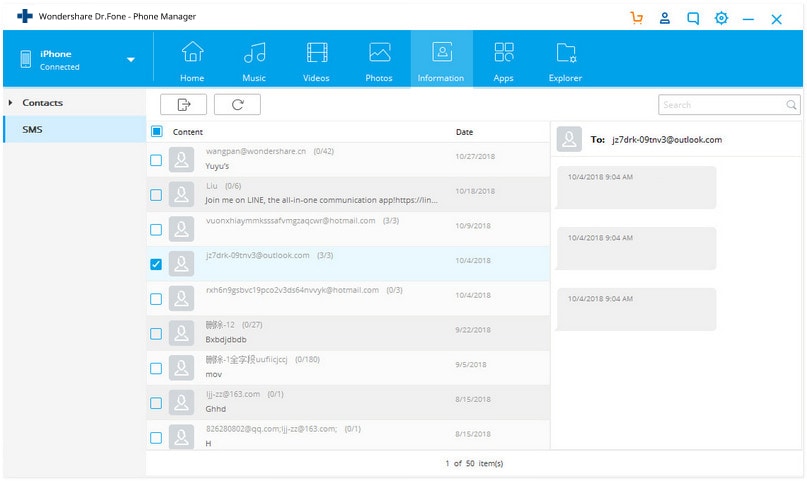
Dr.Fone - Phone Manager (iOS) will now try and detect your iPhone. After Dr.Fone - Phone Manager (iOS) detects your iPhone, you can click on "Information" on the window and choose "SMS" to transfer our iPhone messages and iMessages to PC or Mac. Even though they are not specifically mentioned in the option, iMessages are included in the “Text Messages” option.
You will want to make sure that you leave your iPhone connected the whole time it is transferring your data to your pc as this will take some time.
Step 3. Check our iPhone messages and iMessages on computer
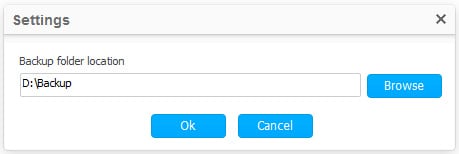
After the backup process is completed, we can click on the pop-up window to view the iPhone messages and iMessages on our computer. We can also go to "Settings" to find our backup files or change the location of our backups on computer.

As we can see above, it is very easy to save SMS/iMessages to computer with Dr.Fone - Phone Manager (iOS). If you are going to backup & transfer your iPhone SMS/iMessages to computer, Dr.Fone - Phone Manager (iOS) is a nice choice.
Part 3: Backup iPhone SMS/iMessages to Compuer with iTunes
The final option I want to show you is backing up your phone using iTunes. There are two major pitfalls to using iTunes. First, it backs up everything on the phone with no ability to specifically select what you would like backed up. Second, it saves the backup in a format which makes the files unreadable on your pc. While it might not be as handy, iTunes can still be a viable option to backup iPhone messages to pc and to backup iMessages to pc.
Steps for using iTunes to complete a backup of your iPhone
Step 1: Connect you phone with iTunes
If needed, start off by downloading and installing iTunes. Connect your iPhone to one of your computer's available USB ports and run iTunes. iTunes will detect your device and show your device in the left side of the window.
Step 2: Initiate full backup to your pc
Click "Summary". And then tick "This computer" and click "Back Up Now" in the right section of the window.

Step 3: Verify and rename backup
After we backup our iPhone data to the computer with iTunes, we can go to "Preferences" > "Devices" to verify it worked or to give it a more meaningful name. If you are unsure how to find the backup's location, you can read this article: How to Find iPhone Backup Location

Dr.Fone - Phone Manager (iOS) – the original phone tool – working to help you since 2003
Join millions of users who have recognized Dr.Fone - Phone Manager (iOS) as the best tool.
It is easy, and free to try – Dr.Fone - Phone Manager (iOS).
Phew! We made it through all three and without too much difficulty. All three of these options have their pros and cons and your decision will depend mostly on the features you are looking for. If you are wanting more control over what you backup you will likely want to use Dr.Fone - Phone Backup (iOS). If you are looking for something with a little more simplicity, or if you want to do a simple phone to computer transfer, you might choose Dr.Fone - Phone Manager (iOS). Finally users looking for a complete backup of their iPhone will want to use iTunes.


iPhone Messages
- Back Up iPhone Messages
- 1. Back up Messages on iPhone
- 2. Save Text Messages on iPhone
- 3. Back up Viber messages
- 4. Back up WhatsApp Data to Computer
- 5. Export WhatsApp Message from iOS
- Delete iPhone Messages
- 1. Delete iMessages on iPhone and iPad
- 2. Delete Snapchat Messages on iPhone
- 3. Delete WA for Everyone
- 4. Delete WA Message Permanently
- 5. Delete Text Messages from iPhone
- 6. Tips about WhatsApp Delete Message
- 7. Undelete Messages on iPhone
- 8. View Deleted iMessage History on PC
- Recover iPhone Messages
- 1. Recover iPhone Deleted Text Messages
- 2. Recover Deleted Viber Messages
- 3. Recover Messages on iPhone 13
- 4. Recover Deleted Message on iPhone 8
- 5. Recover Deleted Message iPhone 6
- 6. Transfer from iPhone to iPhone
- 7. Recover WhatsApp Messages Online
- 8. Restore 1-Year-Old WhatsApp Chats
- Restore iPhone Messages
- 1. Restore Kik Messages from iPhone
- 2. Restore Text Messages on iPhone
- 3. Restore Viber Messages Selectively
- 4. Restore Kik Messages to iPhone
- Transfer iPhone Messages
- 1. Transfer from Android to iPhone
- 2. Transfer from iPhone to iPhone
- 3. Transfer from iPhone to Computer
- 4. Transfer from Android to iPhone XS
- 5. WhatsApp from Android to iOS
- 6. Transfer from Android to iPhone 13
- 7. WhatsApp from iPhone to PC
- 8. Download Text Messages from iPhone
- 9. Sync iMessage between iPhone and Mac
- iPhone Messages Problems
- 1. iMessage Not Working
- 2. iMessage Keeps Crashing
- 3. iMessage Not Syncing on a Mac
- 4.iPhone won't send or receive texts
- 5. iMessage Freezing or Not Working
- 6. Why Are My iPhone Messages Green
- iPhone Message Tricks
- 1. Export Messages from iPhone to PDF
- 2. Know Who Read WA Group Message
- 3. iPhone Message Tips and Tricks
- 4. Access iMessage Online
- 5. Extract Text Messages from iPhone
- 6. Forward Text on iPhone and Android
- 7. Print Text Messages from iPhone
- 8. View iPhone Messages on PC/Mac
- 9. Tell If You Are Blocked on iMessage
Bhavya Kaushik
contributor Editor