Easy Steps To Restore Your iPhone From an iTunes Backup
iPhone Backup
- iPhone Data Backup
- 1. Back up iPhone in Recovery Mode
- 2. Back Up iPhone With/Without iTunes
- 3. Back up iPhone to Mac
- 4. Back up iPhone/iPad to Computer
- 5. Back up iPhone to Mac Catalina
- 6. Back up Jailbreak Apps And Restore
- 7. iPhone Backup Software
- 8. Back up iPhone/iPad Easily
- 9. Back up iPhone/iPad in DFU Mode
- 10. Back up iPhone Apps and App Data
- 11. Back up Notes on iPhone and iPad
- 12. Back up iOS to External Hard Drive
- 13. Export Notes from iPhone to PC/Mac
- 14.Back up iPhone Photos to Google Photos
- 15. Back Up Your iPhone Voicemails
- 16. Back Up to External Drive
- 17.How to Back Up to NAS
- 18.Back Up iPhone With Broken Screen
- 19.Back Up iPhone to Google Drive
- 20.Buy Used iPhones
- 21.Sell Used Phone for Cash
- 22.Sell Used iPhone for Dollar
- 23.How Much is My iPhone Worth
- iPhone Data Recovery
- 1. Recover iPhone Data Without Backup
- 2. Restore Calendar on iPhone
- 3. Recover Call History on iPhone
- 4. Recover iPhone Lost Data
- 5. Restore iPhone in Recovery Mode
- 6. Undelete iPhone Backup Files
- 7. Recover Deleted iPhone Messages
- iPhone Data Restore
- 1. Restore iPhone from iTunes Backup
- 2. Restore iPhone after Downgrade
- 3. Restore iPhone from Backup
- 4. Restore iPhone from iPad Backup
- 5. Restore iPhone from DFU Mode
- 6. Restore iPhone Deleted Text Message
- iPhone Backup Problems
- 1. Find iPhone Backup Location on Mac
- 2. iPhone Backup Password Never Set
- 3. iPhone Backup Password Forget
- 4. iCloud Backup Taking Forever
- 5. iPhone Won't Backup to iCloud
- 6. iTunes Won't Backup iPhone
- iPhone Restore Problems
- 1. iTunes Stuck on Verifying iPhone
- 2. Not Space to Restore iPhone Backup
- 3. iTunes Backup Not Restoring
- 4. iPhone Won't Restore
- WhatsApp Backup & Restore
- 1. WhatsApp from Google Drive to iOS
- 2. Restore Old WhatsApp Backup
- 3. Restore WhatsApp Chat on iPhone
- 4. Retrieve WhatsApp Chat History
- 5. See Deleted Messages on WhatsApp
- 6. Restore WhatsApp Stuck on iPhone
- 7. iPhone WhatsApp to Google Drive
- 8. Back Up WhatsApp on iPhone
- 9. Backup WhatsApp Data before Changing Number
- iPhone Backup Tips
- 1. Extract Data From iPhone
- 2. Encrypt iPhone Backup
- 3. Reset iPhone Backup Password
- 4. Extract iPhone Backup in Win 10
- 5. How Long take iPhone to Backup
- 6. Find iPhone Backup Location
- 7. iPhone Backup Password
- 8. View iPhone Backup on Computer
- 9. iPhone Backup with iTunes/iCloud
- 10. iPhone Backup Unlockers
- 11.How To Encrypt iPhone Backup
- 12. Best Backup Chargers for iPhone
- 13. Speed Up Your iPhone Backups
- 14. Save Data When iPhone Disabled
- 15.Check Last Backup on iPhone
- ● Manage/transfer/recover data
- ● Unlock screen/activate/FRP lock
- ● Fix most iOS and Android issues
- Back up Now Back up Now Back up Now

Sep 04, 2023 • Filed to: Data Recovery Solutions • Proven solutions
Restoring an iPhone backup is crucial for users who want to retrieve their data, settings, and preferences after a software update, device replacement, or accidental data loss. By understanding the various methods available, you can ensure a smooth transition and avoid the risk of losing valuable information.
This article will explore the steps to restore an iPhone from iTunes backup and explore alternative techniques using a powerful third-party application, Dr.Fone – Phone Backup. Not only that, but this guide will also provide the best practices to follow during the restoration process.
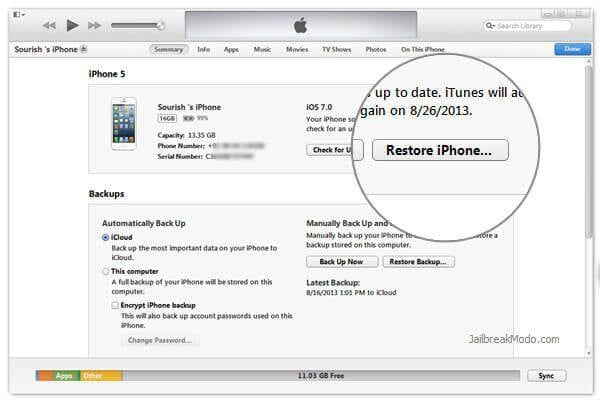
Part 1. Restore Your iPhone to Factory Settings Using iTunes
Restoring an iPhone to factory settings via iTunes can help resolve software issues and provide a clean slate for a new backup. But before you restore an iPhone with iTunes backup, you must first do the following:
- Install the most recent version of iTunes on your computer.
- Backup data on your iPhoneif it contains sensitive information.
- Disable Find My iPhone and switch off WiFi to prevent iCloud auto sync.
Now to restore your iPhone to its factory settings, follow the steps given below:
- Step 1: Connect your iPhone to your computer, launch iTunes, and select your device.
- Step 2: Navigate to the Summary tab and click the Restore iPhone option.
- Step 3: Follow the on-screen prompts to complete the restoration process. Clear visuals will accompany the steps to ensure a seamless experience.
Part 2: How To Restore iPhone From iTunes Backup
Restoring an iPhone from an iTunes backup allows you to retrieve your data and settings effortlessly. This way, you can completely restore the entire backup data to your iPhone. To restore your iPhone with iTunes backup, follow the steps given below:
- Step 1: After connecting your iPhone to your computer and launching iTunes, select your device and go to the Summary tab.
- Step 2: Under the Backups section, choose Restore Backup and select the desired backup file.
- Step 3: Click Restore and let iTunes handle the rest.
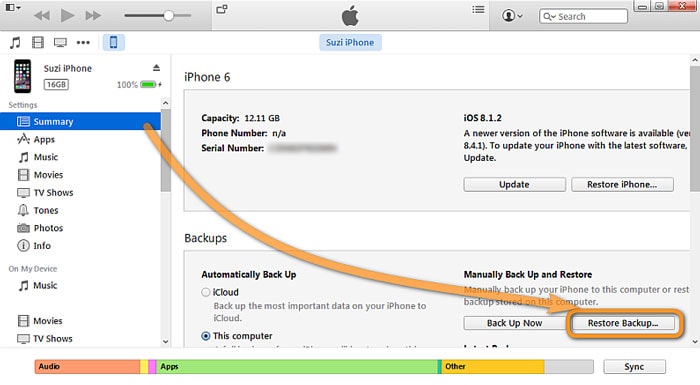
Note: You may also choose Restore Backup... by right-clicking the device's name on the left side. It's the same as you did in the previous steps.
Part 3: Alternative Restore Techniques Without iTunes
While iTunes is a reliable tool, alternative methods can offer additional convenience and flexibility. One significant benefit of restoring an iPhone backup with a third-party app is that it lets you selectively restore whatever data you want from your iPhone backup, unlike iTunes, which converts the backup data entirely.
One such tool is Wondershare Dr.Fone , a comprehensive tool where you can easily restore iPhone backups without needing iTunes. Dr.Fone - Phone Backup, developed by Wondershare, is a versatile software that facilitates secure and convenient iPhone data backup on Mac computers. It offers a user-friendly interface and various features that make the backup process efficient and reliable.

Key Features
As an excellent software with a backup feature, its key features include the following:
- Comprehensive and Flexible Backup Options:Fone - Phone Backup allows users to perform full or selective backups of various data types, including contacts, messages, photos, videos, music, app data, and more.
- One-Click Backup and Restore:With just a single click, users can initiate a complete backup of their iPhone data and easily restore it whenever required.
- Encrypted Backup and Privacy:Fone - Phone Backup offers optional encryption for backups, ensuring the privacy and security of sensitive information.
- Transfer and Export:Users can transfer data between iOS devices, Mac computers, or external hard drives, as well as export data in various formats compatible with different applications.
Pros
- Its straightforward and intuitive interface makes it easy for users to navigate and operate the software.
- Automatic and wireless backup solution for iOS devices.
- Allows users to preview and restore any item from the backup to their devices.
- No loss of data during backup, restore, and transfer.
Cons
- Fone is a commercial software that requires a paid license to access its advanced features.
Pricing
Check out the pricing details for Dr.Fone – Phone Backup (iOS) below:
|
Annual Plan (Auto-renewal, cancel at any time) |
$39.95/Year Access to all features of Dr.Fone Basic (including Dr.Fone- Backup) for one year |
|
Perpetual Plan (One-Time Fee) |
$49.95/Perpetual Access to all features of Dr.Fone Basic (including Dr.Fone- Backup) for Life |
|
Business Plan (Auto-renewal, cancel at any time) |
$59.95/Year Access to all features of Dr.Fone Basic (including Dr.Fone- Backup) for one year |
Note: Phone Backup is sold in a bundle with other functions, including Phone Manager, Phone Backup, iCloud Manager, iTunes Manager, and Screen Mirror in Dr.Fone Basic. For more details on Dr.Fone's pricing plans, please look at the official website.
Technical Specifications
To check if your device is compatible with Dr.Fone – Phone Backup tool, refer to the table below:
|
Processor |
1 GHz or faster (Intel or AMD) |
|
Hard Disk Space |
200 MB of hard-disk space available |
|
Computer OS |
Windows 7 or newer macOS X 10.8 & higher |
|
RAM |
2 GB or higher RAM |
|
iOS Versions |
iOS 9.0 or later are supported. |
Step-by-Step Guide to Restoring iPhone Using Dr.Fone
After backing up your data using Dr.Fone, you can also use the program to restore your iPhone backups. Dr.Fone offers a comprehensive restoration model, which is given and explained further below:
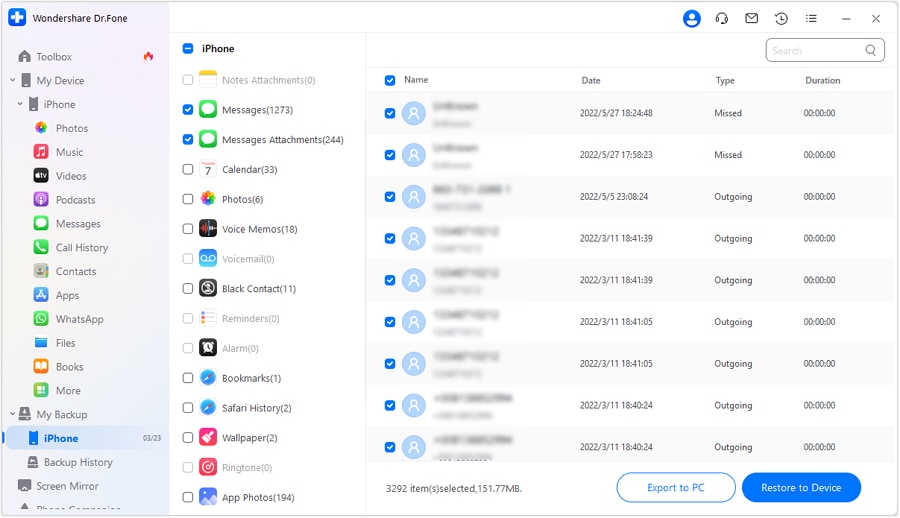
- Step 1: After backing up your device using Dr.Fone, the application will display all the file types. Alternatively, you can use the left panel to reach the Backup History area. This will display the backups that can be restored. To restore your iOS backup file, select any backup and click View.

- Step 2: You can browse all file data and mark the specific data you want to restore by clicking any file type, for example, Call History. Continue by selecting the Restore to Device button.
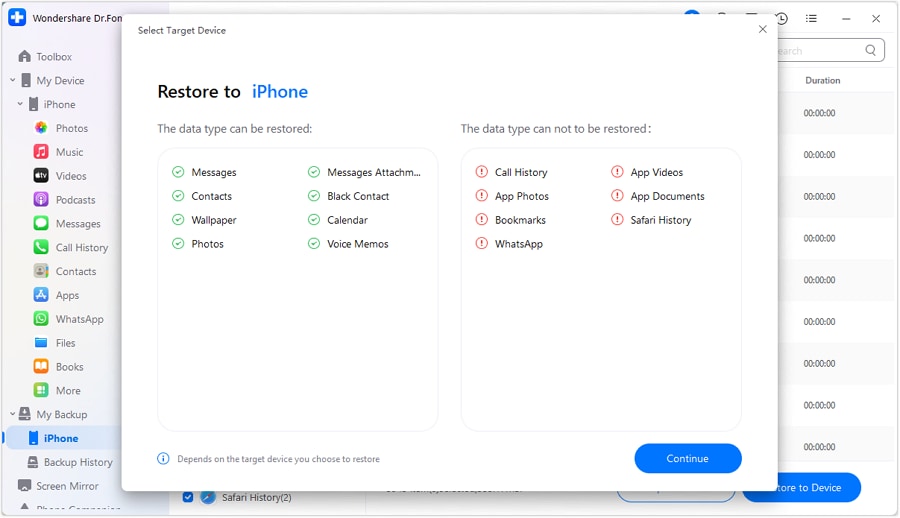
- Step 3: The list of supported and unsupported file formats for device restoration will appear in a new window. Check out the info and click Continue to proceed with the process.
- Step 4: A restoration progress meter is displayed as the process begins. The Cancel button on the screen's bottom can be used to abort the backup restoration process.
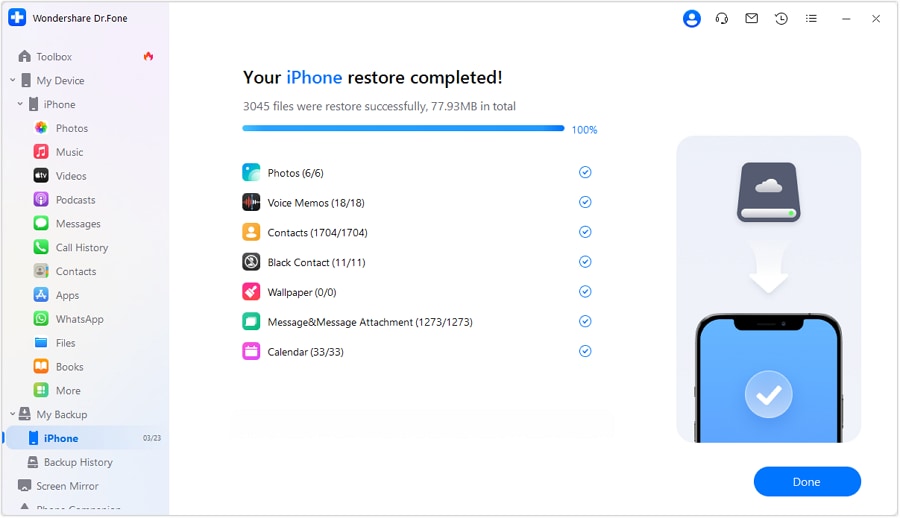
- Step 5: The restoration is complete and will be shown in the next window. All of the recovered files and their descriptions will be shown. To finish, select the Done button.
Part 4. Best Practices for iPhone Restore
Restoring an iPhone from iTunes backup can be crucial, especially when you want to recover lost data or set up a new device. You should follow several best practices to ensure a smooth and successful restore. This section highlights three essential aspects: the data to restore from backup, precautions before initiating the restore process, and tips for a successful restore.
Data to Restore from Backup:
Before initiating the restore process, it is crucial to determine which data you want to restore from your backup. Apple provides various backup options, including iCloud and iTunes.
These backups contain different data types, such as contacts, messages, photos, apps, and settings. Carefully consider your needs and select the appropriate backup option. For example, if you only want to recover specific data or have limited storage, using an iCloud backup with selective restore options might be more suitable.
Precautions Before Initiating the Restore Process:
Before restoring your iPhone, it is essential to take certain precautions to avoid potential issues or data loss:
- Backup Verification:Double-check that your backup is up to date and complete. Verify that the backup process is successful and that all the necessary data is included. This ensures that you have a reliable source to restore your data.
- Power and Connectivity:Ensure your iPhone has a sufficient battery or connects to a power source during restoration. Additionally, it would help if you had a stable and reliable internet connection for iCloud restores or a secure USB connection for iTunes restores.
- Storage Space:Verify that your iPhone has enough storage space to accommodate the restored data. Free up space if needed by deleting unnecessary files or apps before initiating the restore.
- Apple ID and Password:Know your Apple ID and password. This information is required during the restore process, especially when accessing iCloud backups or downloading apps from the App Store.
Tips for a Successful Restore:
To increase the chances of successful restoration, consider the following tips:
- Software Update:Ensure that your iPhone is running the latest version of iOS before initiating the restore. Software updates often contain bug fixes and improvements that can enhance the restore process.
- Stable Connection:Maintain a stable internet or USB connection throughout the restore process. A loss of connection could interrupt the restoration and lead to data corruption or incomplete restoration.
- Patience:Restoring your iPhone can be time-consuming, especially with extensive data. Be patient and avoid interrupting the restore process prematurely. Allow sufficient time for the restoration to complete without interruption.
- Verify Restored Data:Once the restore is complete, verify that all your important data has been restored. Check contacts, messages, photos, and other critical information to ensure nothing is missing or corrupted.
Following these best practices can increase the likelihood of a successful iPhone restore. Remember to carefully choose the data to restore, take necessary precautions, and adhere to tips that optimize the restore process. With a smooth and successful restore, you can quickly regain access to your data and enjoy a seamless iPhone experience.
Conclusion
Restoring iPhone from an iTunes backup can be straightforward when you follow the right steps. You can retrieve your data and settings effortlessly by utilizing the easy steps provided in this article. And for a seamless and reliable restoration experience, Dr.Fone is a highly recommended software tool.
With its user-friendly interface, a wide range of supported data types, and different recovery modes, Dr.Fone drastically simplifies restoring data from iTunes backups. Additionally, its compatibility with various iOS devices and versions ensures that you can confidently restore your iPhone regardless of the model or operating system. Consider using Wondershare Dr.Fone for a hassle-free and efficient restoration of your iPhone from an iTunes backup.


Alice MJ
staff Editor