Dr.Fone User Guide for System Repair
Learn how to use Dr.Fone to fix various iOS/Android issues by yourself within five minutes. Download the latest version of Dr.Fone and get started now.
How to Repair iTunes System Issues?
iTunes is an essential component used within iOS systems for managing multiple operations. Although it has been left out of the mainstream system tools available for iOS devices, many users still opt for this platform for multiple purposes. One such need comes against resolving the system issues within the iOS device if it is not resolved with the primary techniques. This guide recognizes the need to repair iTunes to establish a proper connection.
Manage Your Phone Wherever You Go
Part 1: Which iTunes Errors Can Dr.Fone Repair
While Dr.Fone provides a comprehensive set of operations for performing an iTunes repair, there are a few things that must be recognized before adopting this method. Using the services of Dr.Fone - iTunes Repair, you can easily retain your data and solve all synchronization problems existing against the iTunes service. Furthermore, with this tool, you can get hold of more than 200 iTunes Errors and have them resolved.
The following list provides an overview of the variety of iTunes errors that need to be executed at some stage. Look through the list to identify the source of the iTunes error causing problems in your iOS device.
1. iTunes Common Errors
The first set of iTunes errors involves more than 100 errors that involve some basic discrepancies within the platform. While the platform is usable in such errors at times, you can face issues with the startup and updates of iTunes or discover the software to be crashing, freezing, or displaying other errors.
2. iTunes Connection Errors
Whenever your iTunes is not recognizing or reading the iTunes you are trying to connect with the cable, multiple iTunes connection errors are associated with it. Out of many iTunes errors, iTunes Error 14 and iTunes Error 13010 are some major errors showing connectivity problems within iTunes.
3. iTunes Syncing Errors
For an iOS device that does not sync its data within iTunes, multiple errors come into display showing the failure of the process. For highlighting synchronization problems within iTunes, iTunes Sync Error 54 and Match Not Syncing Properly are a couple of errors you should keep in mind.
However, there are more errors that display synchronization problems in iTunes. "iTunes Stuck on Waiting for Items to Copy" and "iTunes Won't Sync with iPhone, iPad, iPod" are a couple of synchronization errors reported.
Part 2: How To Fix All iTunes Issues?
Dr.Fone offers a complete solution for fixing all iTunes errors, eliminating the need to tackle each issue separately. With Dr.Fone, you can resolve all iTunes-related problems automatically while preserving your data. To learn how Dr.Fone - iTunes Repair helps you in providing a proper iTunes repair system, follow the steps provided below to fix all the issues of your iTunes:
1. iTunes Standard Repair
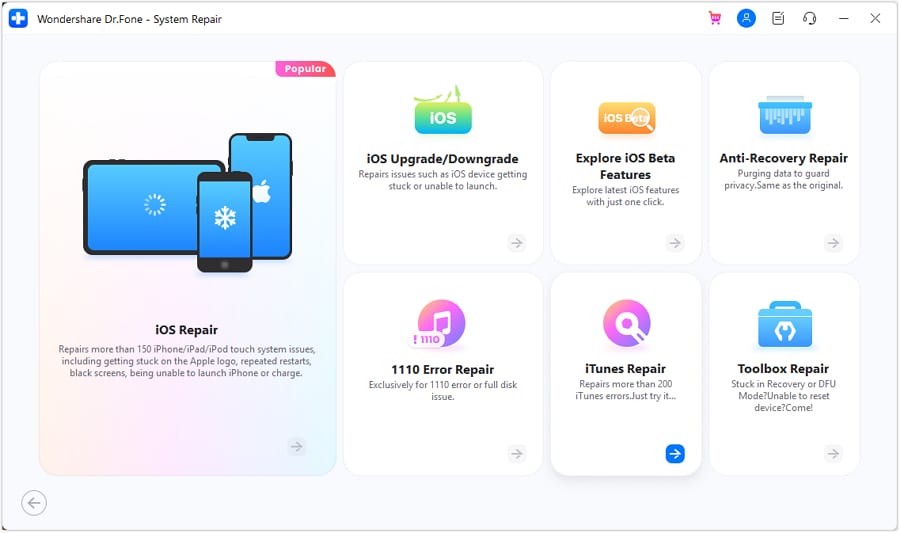
Make sure to download and install Dr.Fone on your computer and launch the platform to redirect into the System Repair tool from the Toolbox section.

* Dr.Fone Mac version still has the old interface, but it does not affect the use of Dr.Fone function, we will update it as soon as possible.
Continue to select iOS as your device type and continue opening another window. Connect your iOS device to the platform through a USB connection.

From the options appearing on the window, continue with the iTunes Repair feature.
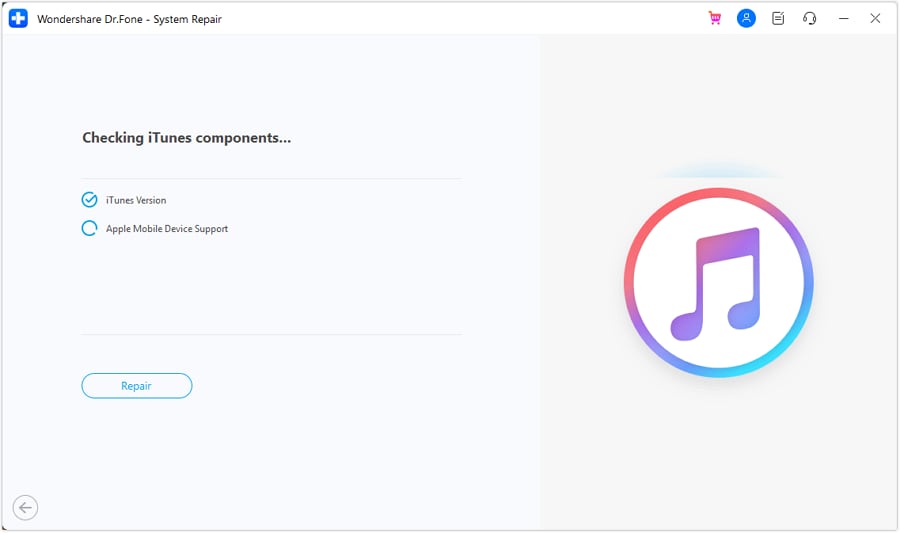
You will be directed to a new window where you have to select any appropriate iTunes error depending on the nature of the problem you are facing.

Proceed to the next screen to observe the initiation of the automatic process of iTunes repair. Click Repair to initiate the standard repairing process for your iTunes.
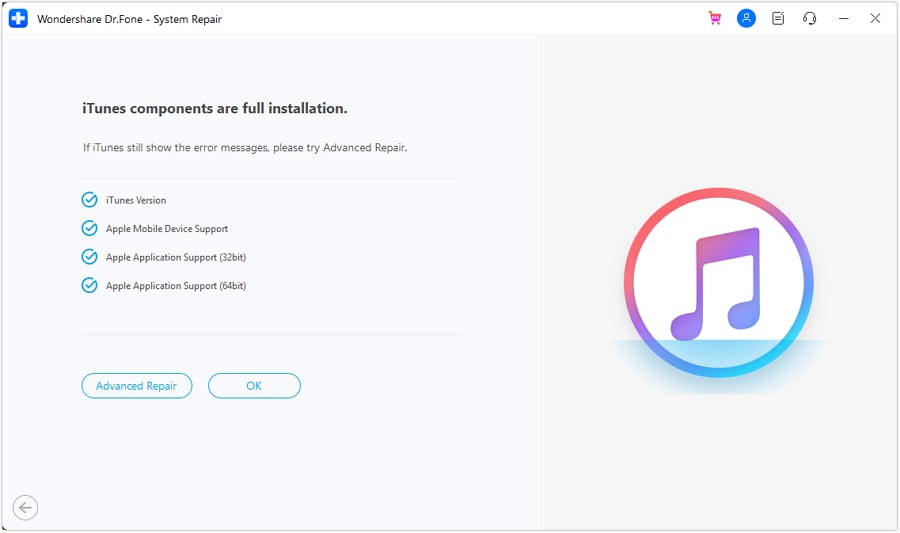
Once all issues are resolved, a comprehensive report is displayed on the window with the option of going for Advanced Repair if needed.
2. iTunes Advanced Repair
If iTunes still show the error messages, please try Advanced Repair. On the same screen, select the respective option and continue.
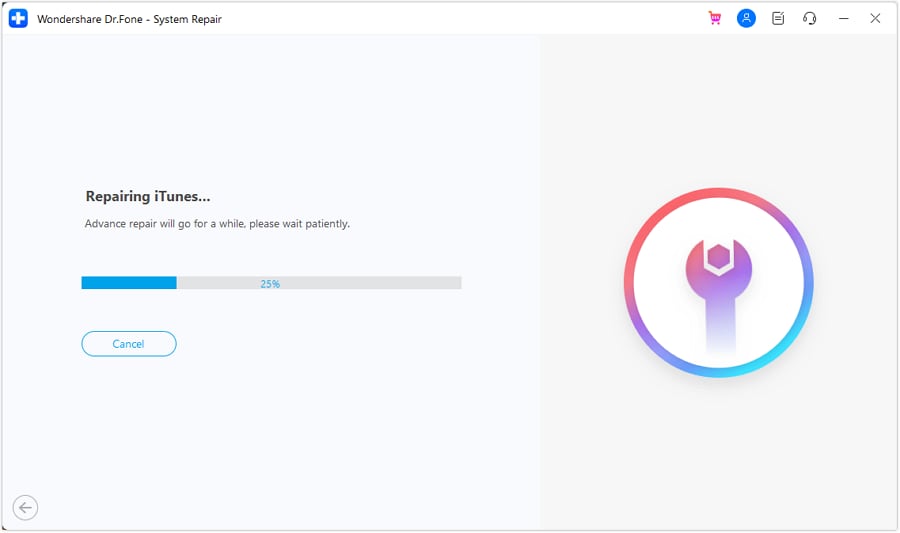
The following window displays the progress of the repair. If you wish to disband the operations, click the Cancel button.
The screen prompts over the completion of the iTunes repair. Continue by clicking OK to conclude the process.

WHAT YOU'LL NEED

Dr.Fone provides a complete set of tools for solving all iOS/Android phone problems.
Need help?
You might find the answer to your question in the FAQ or additional information below: