Dr.Fone User Guide for Dr.Fone Basic
Learn how to use Dr.Fone to manage, backup, and mirror your mobile devices on the computer. Download the latest version of Dr.Fone and get started now.
How To Connect Android/iOS Devices to Your PC With Dr.Fone?
Wondershare Dr.Fone is a complete phone management software providing all diverse and minute functionalities to effectively manage your device. Before starting any operation, it is crucial to connect your device to the software through the computer. This guide will specifically provide an overview of how to connect iOS devices to your PC along with Android devices.
Instruction: Make Sure to Download The Latest Version of Dr.Fone
Download and install the latest version of Wondershare Dr.Fone 13 on your computer. Continue to launch it and find the Toolbox homepage appearing on the front. Continue to the My Device section from the left panel to connect your smartphone devices to the computer.
Part 1. Connect Your iOS Device With Dr.Fone
We will connect an iOS device to Dr.Fone through multiple methods. Follow the guidelines provided to know how to connect iPhone to a PC wirelessly and through wired connections:
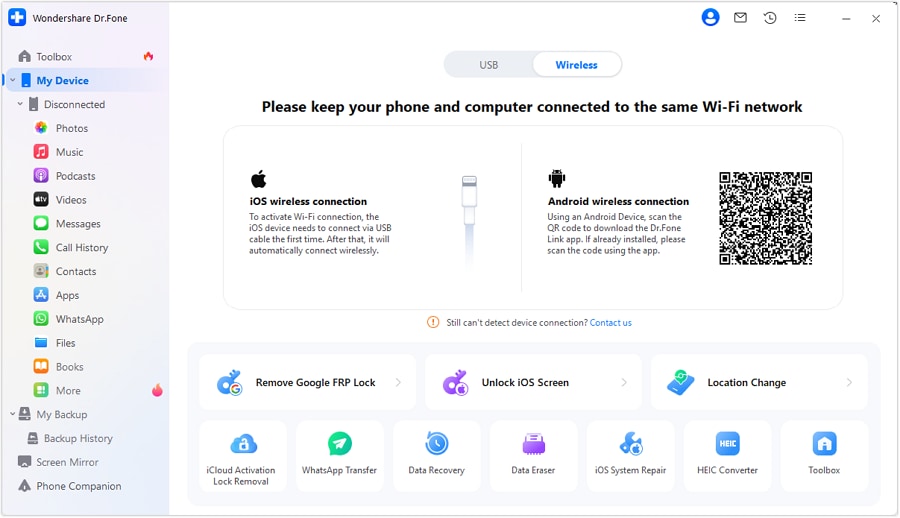
Method 1. Connect With Wi-Fi
To connect your iOS device through a Wi-Fi connection, you first have to connect the device through a USB cable. After it connects for the first time, it will automatically connect with Dr.Fone wirelessly whenever it is turned on. However, always ensure that your phone and computer are connected to the same Wi-Fi network.
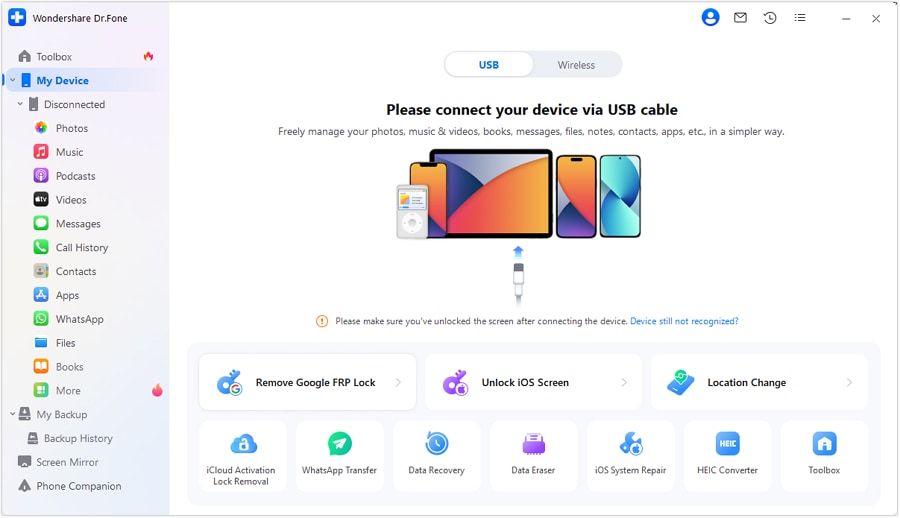
Method 2. Connect With a USB Cable
The process of connecting your iPhone with a USB cable is quite basic. Follow the steps below to learn more about the procedure:
As you launch Dr.Fone on your computer, access My Device > USB from the top section of the screen. Continue to attach your iPhone with a USB cable and connect it to the computer.
As the screen indicates, you will have to unlock your iPhone and trust the device by tapping on the Trust option appearing on the screen. You might have to enter the screen passcode to unlock your iPhone for security reasons. If no popup appears on the iPhone's screen, click the Show popup again button.

Once the device connects, information will be displayed below the My Device section. You can also observe all major descriptions involving the smartphone on the computer’s screen.

Part 2: Connect Your Android Device With Dr.Fone
Do you also want to connect an Android device to a PC with Wondershare Dr.Fone 13? Find out how it is done with the guidelines provided as follows:
Method 1. Connect With Wi-Fi
To connect an Android device to the computer, you will require the Dr.Fone Link app installed on your smartphone. However, as you launch Dr.Fone, scan the QR code to download the Dr.Fone Link app on your Android. If it is installed, scan the code using the application.
You need to launch Dr.Fone on your computer and look for the My Device > Wireless option for scanning the QR code on the device’s screen.
On your Android, download and launch the Dr.Fone Link app. Then select the QR Code scan button on the top right to scan the code on the computer's screen.


The device will automatically connect to the computer, displaying its details in the dashboard.

Method 2. Connect With a USB Cable
If you seek to connect your device with a USB cable, the process has been explained below. Follow the provided steps to connect an Android device to a PC through a USB connection:
As you open Dr.Fone, lead into the My Device > USB section before connecting your Android device with the USB cable. You might have to enable USB debugging on your smartphone as you connect to the device. For that, follow the on-screen instructions where you have to tap the Build Number option seven times.

Following this, authorize the connection by tapping the Allow option on the Android device. If no prompt is displayed on the Android, select the Show Again option on the computer.

While a connection is established, the Dr.Fone Link application will be automatically installed on the Android device. You might have to confirm the prompt before installing the application on your device.
Launch Dr.Fone Link app on your Android and provide the required permissions for displaying its details and data on the computer. Once provided, click Done on the computer.

The details of the Android device will be displayed on the screen and can be easily accessed.
WHAT YOU'LL NEED

Dr.Fone provides a complete set of tools for solving all iOS/Android phone problems.
Need help?
You might find the answer to your question in the FAQ or additional information below: