How to Take A Full Backup of Android Phone With/Without Root
Samsung Backup
- Data Backup
- 1. Back Up Samsung to Google Drive
- 2. Backup Contacts on Samsung
- 3. Backup Text Messages on Samsung
- 4. Backup Photos on Galaxy
- 5. Backup Samsung Galaxy to PC
- 6. Samsung Cloud Backup Services
- 7. Backup Samsung Contacts Solutions
- 8. Samsung Message Backup Solutions
- 9. Samsung Photo Backup Solutions
- Device Backup
- 1. Backup Android to Mac
- 2. Backup and Restore Samsung
- 3. Backup Everything on Samsung
- 4. Samsung Backup Solutions
- 5. Backup Samsung S10 to PC
- WhatsApp Backup
- 1. Backup WhatsApp Business
- 2. Top 8 WhatsApp Backup Solutions
- 3. 2 Ways to Backup WhatsApp to Mac
- 4. Backup WhatsApp to PC
- 5. Recover WhatsApp Messages
- 6. WhatsApp Backup Extractor
- Samsung Kies
- 1. Samsung Kies 3
- 2. Alternatives to Samsung Kies
- 3. Best Samsung Kies Alternatives
- 4. Samsung Kies Download
- 5. Samsung Kies Driver
- Samsung Tricks
- 1. Fix Samsung Brick
- 2. Recover Data from Dead Samsung
- 3. Flash Samsung with Odin
- 4. Remove Google Account Bypass
- 5. Factory Reset Samsung Galaxy
- 6. Samsung Root Software
- 7. Transfer Files from Samsung to PC
- 9. Samsung Smart Switch Solutions
- 10. Bypass Lock Screen Pattern
- 11. 2 Ways to Unlock Samsung
- 12. Transfer Whatsapp Messages
- Backup Tips
- ● Manage/transfer/recover data
- ● Unlock screen/activate/FRP lock
- ● Fix most iOS and Android issues
- Back Up Now Back Up Now Back Up Now

Feb 29, 2024 • Filed to: Backup & Restore Data • Proven solutions
In order to make sure that you never lose your data, it is important to take its timely backup. Fortunately, there are plenty of ways to perform Android full backup. In this post, we will make you familiar with different ways to do full Android backup with a rooted as well as a non-rooted device. Let’s get it started!
- Part 1: Fully Backup Android with SDK No Root (Time Consuming)
- Part 2: How to Fully Backup Android with Dr.Fone - Phone Backup (Android) (One click solution)
- Part 3: Fully Backup Android with Orange Backup App (root required)
Part 1: Fully Backup Android with SDK No Root (Time Consuming)
If you don’t have a rooted phone, then taking a complete backup of your device can be a little tedious. Nevertheless, with Android SDK, you can make it happen for sure. If you wish to perform a full backup Android without rooting your device, then you can take the assistance of Android SDK. With this technique, you would be able to backup your data to your system and can restore it afterward. Though, before this, you need to download the latest version of the Android SDK and install it on your system. You can get it from right
Additionally, you need to turn on the USB Debugging option on your device. To do so, visit Settings > About Phone and tap the “Build Number” seven times. This will enable the Developer Options. Now, visit Developer Options (under Settings) and turn on the feature of USB Debugging.
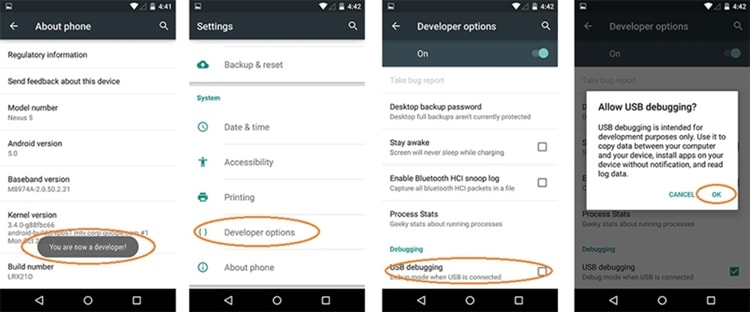
Great! After meeting all the requirements, follow these steps to perform Android full backup using Android SDK tool.
1. Start by connecting your Android phone to the system using a USB cable. Your phone might get a pop-up message regarding USB Debugging permission. Just agree to it and open the command prompt on your system.
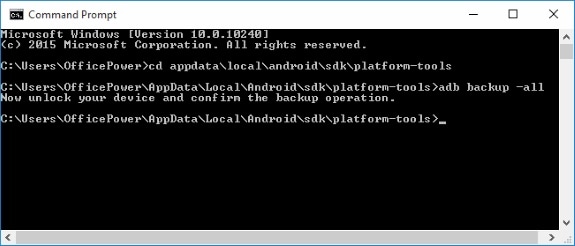
2. Now, go to the location where you have installed the ADB. Most of the times, it is found at “C:\Users\username\AppData\Local\Android\sdk\platform-tools\”.
3. Afterward, type the command “adb backup –all” to take full Android backup of your device. It will take the backup of app data and system data. The backup will be saved as “backup.ab”.
4. You can always alter the command to do selective backup. For instance, you can add “-apk” after the command “adb backup” to take the backup of apps. The “-noapk” won’t take the backup of your app. Also, “-shared” will take a backup of data on the SD card.
5. After giving the desired command, you will get a prompt on your phone. Provide an encryption password (this is used to restore the data afterward) and tap on the “Backup my data” option to do full backup Android.

All you got to do is just wait for a while as the system will take the backup of your device.
Part 2: How to Fully Backup Android with Dr.Fone - Phone Backup (Android) (One click solution)
If you wish to take a complete backup of your device, then you should give Dr.Fone - Phone Backup (Android) a try. With just a single click, you can take full Android backup of your device and can restore it whenever you want. The application works for both rooted as well as non-rooted devices. It is a part of the Dr.Fone toolkit and is compatible with more than 8000 different Android devices.
Dr.Fone - Phone Backup (Android) provides a safe and reliable way to perform Android full backup with a single click. Even if your device is not rooted, you can take an extensive backup of data like pictures, videos, contacts, SMS, calendar, applications, and more. With a rooted device, you will get an additional benefit to take even the backup of application data. In order to perform full backup Android, simply follow these steps.
Dr.Fone - Phone Backup (Android)
Flexibly Backup and Restore Android Data
- Selectively backup Android data to computer with one-click.
- Preview and restore backup to any Android devices.
- Supports 8000+ Android devices.
- There is no data lost during backup, export or restore.


1. Download Dr.Fone - Phone Backup (Android) from its official website. Install it on your system and open it whenever you are ready. Out of all the options, you will get on its welcome screen, pick the “Phone Backup” one and continue.

2. Connect your device to the system and allow the permission for USB Debugging. The application will automatically detect your phone and provide different options. Click on “Backup” to proceed.

3. Now, simply select the type of data that you want to backup. You can always select every type or pick the kind of files you want to save. When you are done, click on the “Backup” button to initiate the process.

4. Sit back and relax as the application will start taking the backup of your device. It will let you know of the progress as well. Make sure that you don’t disconnect your device from the system and give it some time to take the backup.

5. As soon as the application will take the entire backup of your device, it will let you know with the following congratulatory message. You can now safely remove your device or can even view the newly backup data by clicking on the “View the backup” option.

That’s it! With just one click, you can perform Android full backup using this remarkable tool.
Part 3: Fully Backup Android with Orange Backup App (root required)
If you have a rooted device, then you can also take its backup using the Orange Backup App. Currently, it supports EX4, TWRP, and CWM recovery and doesn’t work for non-rooted devices. You can take a full backup Android using Orange Backup App after following these instructions.
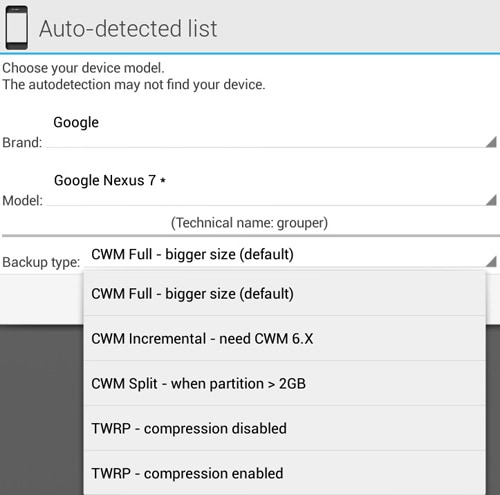
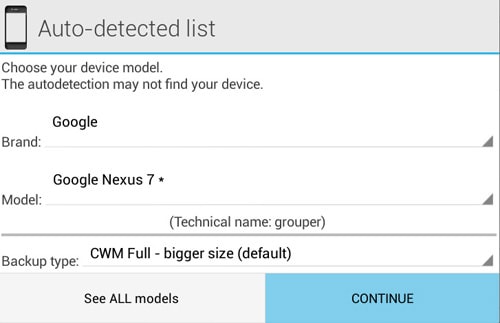
1. After successfully installing the app, launch it on your device and grant it the root access. It might detect your device automatically, but if it won’t work, you will get the following screen. You can manually select your device and brand here.
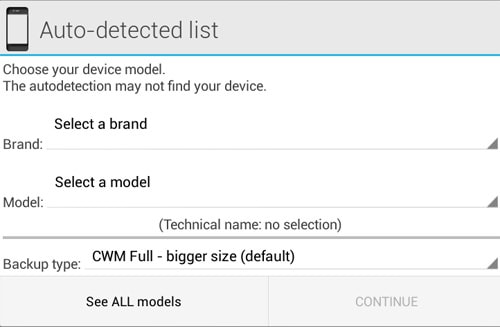
2. Now, select the “backup type” that you wish the application to perform. It might depend on your device or your requirements.
3. When it is done, just tap on the “Continue” button in order to proceed.
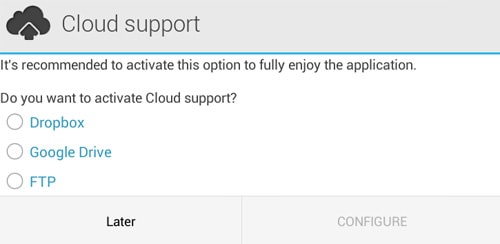
4. The application will ask you to configure the cloud support. You can simply choose the preferred option and tap on the “Configure” button.
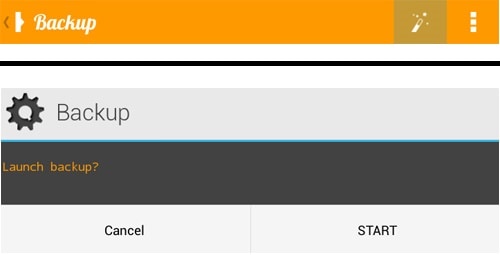
5. Just tap on the magic wand icon to launch the backup option. Tap on the “Start” button to initiate it.
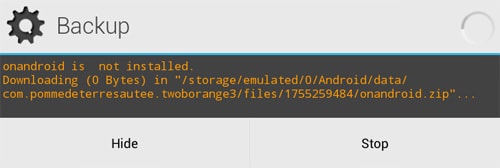
6. Give the application some time as it will take a backup of your data. Try not to stop the process in between.
7. As soon as the application would be able to take the entire backup of your device, it will let you know. Your screen will look similar to this.
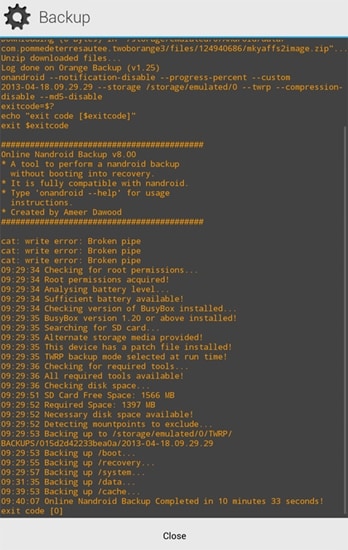
This means that the application has taken the full Android backup of your device.
We are sure that after going through this informative tutorial, you won’t face any trouble in order to perform Android full backup. It doesn’t matter if you have a rooted or a non-rooted phone, with these options you would be able to take full Android backup without much trouble. Feel free to reach out to us if you have any doubts.


Alice MJ
staff Editor