
Ultimate Samsung Flash Guide - One Click & Odin Methods Explained

Apr 02, 2024 • Filed to: Mobile Repair Solutions • Proven solutions
Are you constantly facing bugs, issues that are crippling the smoother functionality of your device? Or have you recently encountered unexpected turns of events that includes black screen of death, the System UI not working properly, applications crashing enormously. And despite the repetitive attempts of fixing all these problems fails to work, flashing the phone becomes the need of the hour.
By flashing the phone, almost all the data, components and files present there will get wiped off and installs a fresh OS version. Moreover, it even removes any errors or bugs prevailing over your device along with the login usernames, passwords for third party services. It even brushes the root of obstructions that poses as a hindrance to the normal functioning of the device. All in all, flashing phone makes your phone brand new and error free.
If you care to know how to flash a Samsung phone, then read this article carefully. As, we will acquaint you with the best possible methods of performing Samsung flash.
Part 1: Preparation Before flashing Samsung
It is not a cakewalk to flash Samsung device, there are some prerequisites one must follow. This will ensure that the flashing progresses smoothly. Here are some of the considerations you need to take care of.
- Charge your phone to full: While flashing your phone, it is very important that you ensure to keep your device fully charged before proceeding. This is because it eats out the battery of your phone quickly as, it has to undergo so many stages of booting, recovery and restarting which highly impacts the battery of your phone. Also, just in case your device gets switched off while flashing, you may end up with nothing but a bricked device.
- Maintain backup of your data beforehand: It is very crucial to maintain the backup of each and every component available in your phone, as flashing will wipe everything off. So, whether it’s your streak of pictures, saved documents, text messages, call logs, note etc., everything should be saved to your cloud storage or your PC.
- Have basic knowledge of Flashing process: Even if you are a novice, you must be aware of the ins and outs of flashing. Just as, we’ve discovered that it can remove all types of data and redirect back to its old state (sans data). Therefore, any wrong move will brick your device.
- Install Samsung USB drivers: Before you get started with the tutorial to flash Samsung, the correct Samsung USB drivers must be installed over your PC to ensure proper connection.
- Keep It Stock: Ensure your Samsung phone has a stock firmware installed. If you’re using a rooted phone or have installed a custom ROM, flashing might not be the same. You’ll need to revert to the stock firmware, which is usually available online, and have the right files ready for flashing.
Part 2: How to Flash Samsung in One Click?
Flashing is an age-long process that can screw your time and efforts. However, there is a way that can handle flashing in just one-click and that’s Dr.Fone - System Repair (Android) for you! With 100 % success rate, Dr.Fone - System Repair is a one-stop tool available in the market. Besides flashing your Samsung phone, this can work greatly to fix issues like app crashing, black screen of death, system download failure etc.
Dr.Fone - System Repair (Android)
Best tool to flash a Samsung phone without Odin
- 1-click technology for executing repair operations and flashing firmware simultaneously.
- Can repair phone stuck in various modes like, Black screen of death, stuck in boot leap, play store not responding, app crashing etc.
- Fully supports almost all the Samsung models, countries and carriers.
- Has an active 24 hours helpline to assist users with any queries or problems.
- Ensure secured execution of repair and flashing operation to avoid bricking
- Has the highest success rate in repairing/flashing Samsung devices.
How to Use Dr.Fone - System Repair (Android)
Let us now understand how Dr.Fone - System Repair (Android) is useful in flashing Samsung phone.
Step 1: Getting started with dr. fone - System Repair (Android)
Download and install the Dr.Fone - System Repair (Android) on your PC. In the interim, draw connection of your PC and Samsung phone using a genuine USB cable respectively.

Step 2: Head on to System Repair mode
Begin with launching the program and tap “System Repair” option over the main interface. Ensure to select “Android Repair” option located in the left panel of the window and then hit on the “Start” button.

Step 3: Feed in device specific information
On the next segment, you’re required to feed the basic details of your device. Then, check mark the warning besides “Next” button followed by clicking on “Next”.
Step 4: Getting on Download Mode and downloading firmware
Make use of the on-screen instructions to put your device into the Download mode and then, click on “Next” to proceed with downloading the firmware package.

Step 5: Repairing process starts
After the package is downloaded, the program will automatically start repairing. And the message of “Repair of the operating system is completed” reflects on the program.

Benefits of Using Dr.Fone
- User-friendly interface
- No need for a separate firmware download
- One-click process
- No technical knowledge required
- Suitable for most Android system issues
Dr.Fone - System Repair (Android) is a reliable tool for users who prefer a straightforward, user-friendly approach to flashing their Samsung phones without the need for Odin.
Part 3: How to Flash Samsung with Odin?
Samsung’s Odin is a multi-functional ROM flashing tool that takes care of a variety of activities such has rooting, flashing and installing custom ROM. This is a completely free of cost tool helpful in unbricking Samsung phones. With Odin, you can also setup kernel into the phone and even update your phone as or when required. It also provides free of cost flash root packages, flash custom ROMs recovery tools and other vital tools as well.
How to Flash with Odin?
Here is the complete guide on how to flash Samsung device using Odin.
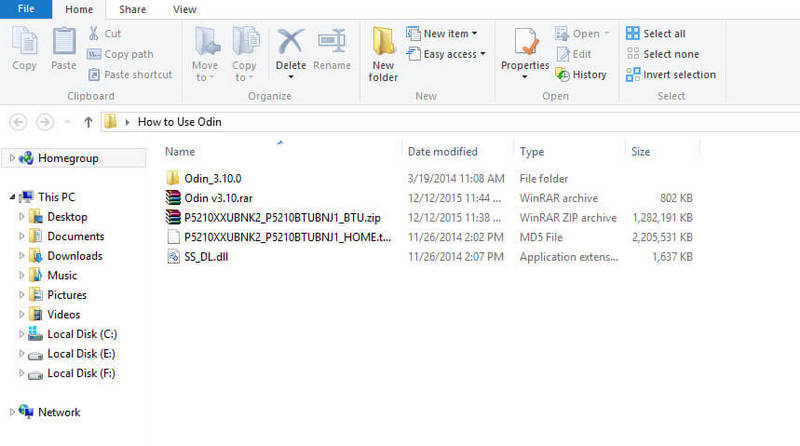
- Step 1. To begin with, download and install the Samsung USB Driver and Stock ROM (compatible with your device) on the PC. Then, go on to extract files on your PC.
- Step 2. Switch off your device and proceed with booting the phone in the download mode. Here is how-
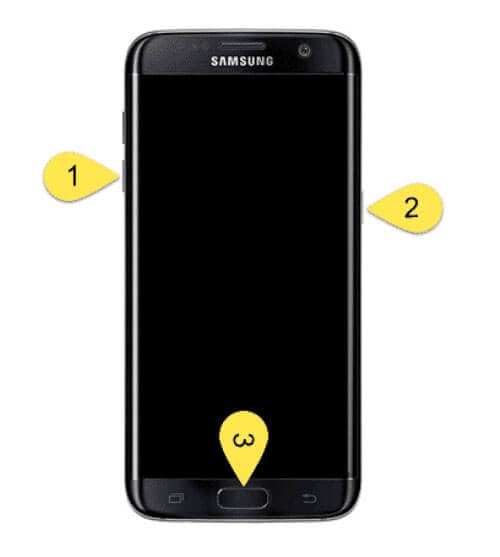
- Step 3. Simultaneously tap and hold the “Volume Down” key, “Home” key and “Power” key.
- Step 4. When you feel the phone getting vibrated, lose hold of “Power” key but continue to press “Volume Down” key and “Home” key.
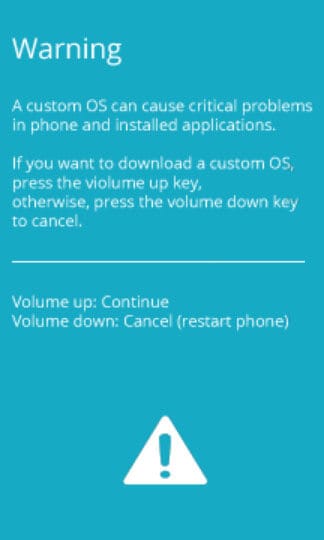
- Step 5. The following screen will come up with the “Warning Yellow Triangle”, just hold the
“Volume up” key to continue.
- Step 6. Now, download and extract “Odin” to your PC. Proceed to open “Odin3” and get your device connected with the PC.
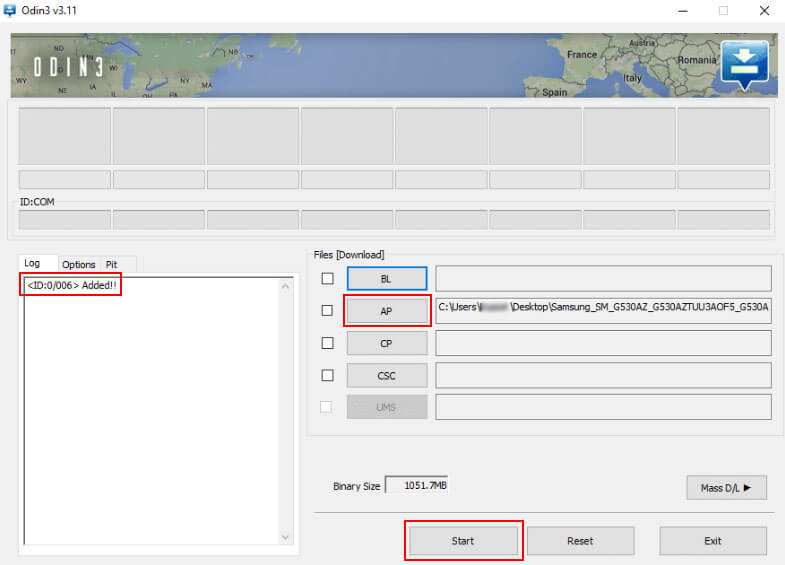
- Step 7. Allow Odin to automatically recognize device and then reflect “Added” message at the bottom left panel.
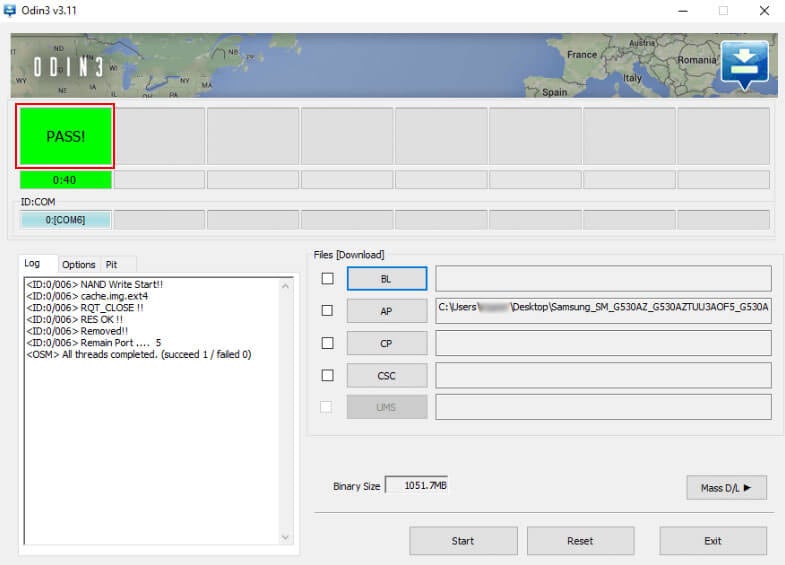
- Step 8. After the device is detected by Odin, tap on “AP” or “PDA” button followed by importing “.md5” file (stock rom) extracted before.
- Step 9. Start the flashing process by clicking on “Start” button.
- Step 10. If “Green Pass Message” occurs over the program, then remove USB cable from the device (your Samsung phone will restart automatically).
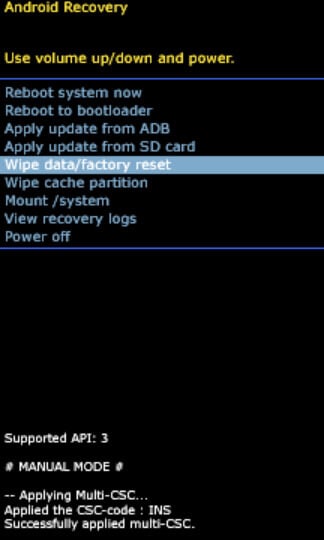
- Step 11. You’ll notice your Samsung device will get stuck into the Stock Recovery mode. Enable it from the following manner: Hold the “Volume up” key, “Home” key and “Power” key. Once the phone vibrates, release “Power” key but continue to hold “Volume up” and “Home” key.
- Step 12. In the Recovery Mode, opt for “Wipe Data/Factory Reset”. Restart device when cache is brushed away. And then, your device will restart automatically without any hassles.
Best Practices with Odin
- Double-check the Odin version and the guide you’re following to avoid any discrepancies.
- Use original USB cables to connect with your computer.
- Always download firmware from reputable sources.
- If you’re not sure about a specific step, do not proceed and seek further advice.
Flashing with Odin is an advanced method that requires careful attention to detail. While it grants power users more control over the flashing process, it’s not as approachable as Dr.Fone - System Repair (Android), and can be intimidating for beginners.
Conclusion
Flashing your Samsung phone with or without Odin can be a worthwhile endeavor, offering a custom solution to your device’s unique problems. Whether you opt for a user-friendly solution like Dr.Fone - System Repair (Android) or take the more hands-on approach with Odin, it’s essential to follow the process diligently and make necessary preparations. By doing so, you can give your Samsung phone a new lease on life, ensuring it continues to serve you as capably as the day you bought it.


Other Popular Articles From Wondershare
Samsung Issue
- Samsung Phone Issues
- 1. Fix Samsung Camera Failed
- 2. Fix Samsung Phone Hang
- 3. Fix Samsung S7 Won't Turn On
- 4. Fix Samsung Brick
- 5. Fix Samsung S6 Won't Turn On
- 6. Fix Samsung Keyboard Stopped
- 7. Fix Samsung S5 Won't Turn On
- 8. Fix Samsung Pay Not Working
- 9. Samsung ROM Download & Install
- 10. Samsung Firmware Download
- 11. Fix Samsung Sudden Death
- 12. Fix Samsung Stuck on Boot Screen
- 13. Fix Samsung Frozen on Startup
- 14. Full Guide to Fix 'Samsung Galaxy Phone Keeps Restarting'
- 15. Fix Samsung S3 Won't Turn On
- 16. Fix Samsung J7 Problems
- 17. Fix Samsung S10 Gone Dead
- 18. Fix Samsung S10 Won't Turn On
- 19. Fix Samsung Galaxy S7
- Samsung Screen Issues
- 1. Fix Unresponsive Touchscreen
- 2. Fix Black Screen After Dropping
- 3. Resolve Screen Stuck on Boot Issue
- 4. Fix Samsung Fold Screen Issues
- 5. Fix Samsung Black Screen
- 6. Fix Samsung Screen Not Working
- 7. Fix Half of Screen Not Working
- 8. Fix Samsung Stuck on Bootloop
- 9. Fix Samsung Screen Blacked Out
- 10. Fix Screen Blacked During a Call
- 11. Fix Samsung Stuck on the Screen
- 12. Solve Samsung TV Blackout
- 13. Fix Samsung Flip Screen Not Working
- 14. Fix Screen Won't Respond
- Samsung Tablet Issues
- 1. Fix Samsung Tablet Problems
- 2. Fix Samsung Stuck on Logo
- 3. Fix Samsung Tablet Won't Turn On
- 4. Fix Touch Screen Not Working
- Samsung Update
- 1. Flash a Samsung phone
- 2. Samsung Mobile Software Update
- 3. Update Samsung Kies for Mac
- 4. Update Samsung to Android Oreo
- 5. Update Samsung Kies on PC
- 6. Update Android 6.0 for Samsung
- Samsung Useful Tricks
- 1. Remove Google Account Bypass
- 2. Hard/Factory Reset Samsung
- 3. Samsung Root Software
- 4. Transfer Files from Samsung to PC
- 5. Top 5 Samsung Kies Alternatives
- 6. Bypass Samsung Lock Screen Pin
- 7. SIM Network Unlock PIN
- 8. Transfer Whatsapp to iPhone
- 9. Samsung Auto Backup
- 10. Recover File on Samsung
Alice MJ
staff Editor
Generally rated4.5(105participated)