How to Backup your iPhone X – in 3 Different Ways?
iPhone X Series
- iPhone X Backup
- iPhone X Problems
- 1. iPhone SE/X/XR Won't Turn On
- 2. iPhone X/XR Stuck on Black Screen
- 3. iPhone 11 Frozen Screen
- 4. iPhone XR/11/12 Won't Turn Off
- 5. iPhone X Screen Not Responding
- 6. iPhone X Siri Not Working
- 7. iPhone XS Screen Not Responding
- 8. IPhone XS Won't Turn On
- 9. iPhone SE/X Keep Restarting
- 10. iPhone SE/X Won't Charge
- iPhone X Transfer
- 1. Put Music to iPhone X/8 (Plus)
- 2. Music from iTunes to iPhone X
- 3. Music from Mac to iPhone XS
- 4. Data from Computer to iPhone
- 5. Transfer from iPhone 6 to iPhone 8
- 6. Message from Android to iPhone XS
- 7. Data from iPhone to iPhone XS
- 8. Messages from iPhone to iPhone XS
- 9. Sync Music from iTunes to iPhone XS
- iPhone X Unlock
- 1. Unlock iPhone X/XR from Carrier
- 2. Unlock iPhone X/XR Lock Screen
- 3. Unlock iPhone XS without Face ID
- 4. Unlock iPhone XS without Passcode
- 5. Bypass iPhone X Activate Lock
- iPhone X Tips
- 1. Factory Reset iPhone X/XR/XS (Max)
- 2. Save Text Messages on iPhone
- 3. Screen Record on iPhone X
- 4. Screen Record on iPhone XR
- 5. Screen Record on iphone XS
- 6. Sell Old iPhone X Series Online
- 7. iPhone XR Screen Mirroring
- 8. Screen Mirror iPhone X
- 9. iPhone Photo Printers
- 10. Enter & Exit DFU Mode on iPhone X
- 11. Add Ringtones to iPhone XS

Feb 29, 2024 • Filed to: Backup & Restore Data • Proven solutions
Every smartphone user knows how important it is to backup their important data. If you don’t want to lose your photos, videos, contacts, messages, or any kind of content on your iPhone X, then it is important to learn how to backup iPhone X. If you have got a brand new iPhone X, then you should make a habit of taking its regular backup. After having an iPhone X backup, you can easily restore it to retrieve your data backup. In this post, we will teach you how to backup iPhone X to iCloud, and on local storage via iTunes and Dr.Fone.
Part 1: How to backup iPhone X to iCloud?
By default, every iPhone user gets a free storage of 5 GB on iCloud. Later, you can extend this space by buying more storage. Just like other popular iOS devices, you can also backup iPhone X to iCloud as well. Without connecting your iPhone to your system, you can simply take its comprehensive backup. You can even turn on the option for scheduled automatic backup as well. Later, an iCloud backup file can be used to restore a device. To learn how to backup iPhone X on iCloud, follow these steps:
- 1. Unlock your iPhone X and go to its Settings > iCloud option.
- 2. Tap on the “Backup” option and make sure iCloud backup is turned on.
- 3. Furthermore, you can switch on or off the backup option for any kind of content from here.
- 4. To take an immediate backup, tap on the “Backup Now” button.
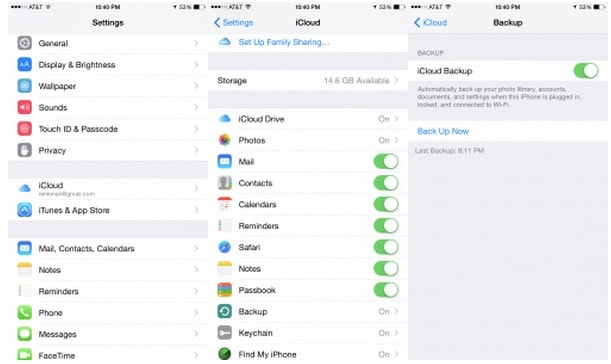
Before you proceed, make sure you have a stable internet connection. It might take a while to backup iPhone X to iCloud and a large chunk of your network usage would also be consumed in this process.
Part 2: How to backup iPhone X to iTunes?
You can also take the assistance of iTunes to perform iPhone X backup without any trouble. Even though you won’t be able to take a selective backup, it is a more time-saving process than iCloud. By taking the assistance of iTunes, you can take a backup of your device either on iCloud or the local storage. You can learn how to backup iPhone X via iTunes by following these steps:
- 1. To start with, launch an updated version of iTunes. If the iTunes you are using is not updated, then it might not detect your iPhone X.
- 2. Wait for a while as iTunes will detect your phone. You can simply go to the device icon and select your iPhone X.
- 3. Afterward, visit the “Summary” section from the left panel to get all the options related to your device.
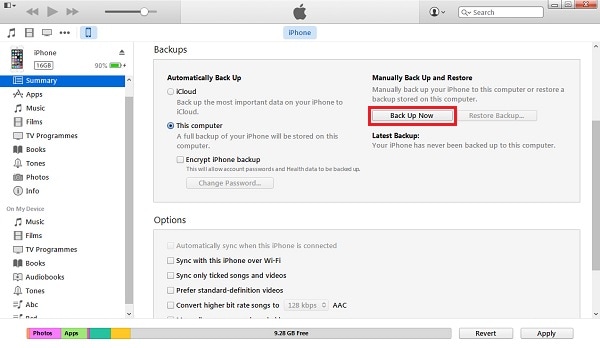
- 4. Under the “Backup” section, you can choose to take a backup of your device (or restore it).
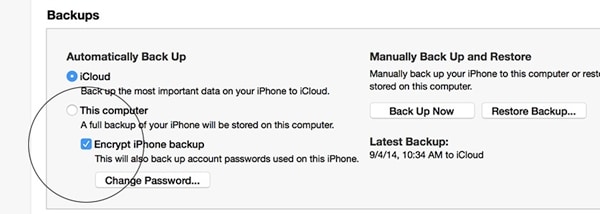
- 5. From here, you can select if you wish to take a backup on iCloud or the local storage.
- 6. After making your selection, click on the “Backup Now” button to prepare a backup file of your content.
- 7. Wait for a while as iTunes will take a backup of your device’s data. Later, you go to iTunes’ Preferences > Devices and check the latest backup file.
Part 3: How to backup iPhone X selectively with Dr.Fone?
If you wish to take a selective backup of your data, then you can simply take the assistance of Dr.Fone iOS Data Backup and Restore. A part of the Dr.Fone toolkit, it provides a 100% secure and reliable results while performing iPhone X backup. The tool is already compatible with all the leading version of iOS (including iOS 13). You can simply connect your iPhone X and take a backup of your data with just one click. The application can also be used to restore your backup to iPhone X or any other device.
Dr.Fone iOS Data Backup and Restore supports almost every kind of content like photos, videos, audios, messages, contacts, call logs, notes, and more. It has a dedicated desktop application for Mac and Windows system. Users won’t experience any kind of data loss or compression while using this tool. Unlike iTunes or iCloud, you would be able to select the kind of data you wish to backup. You can simply follow these steps to learn how to backup iPhone X with Dr.Fone.
Dr.Fone Basic
Backup & Restore iOS Data Turns Flexible.
- One-click to back up the whole iOS device to your computer.
- Preview and selectively restore files to any device with simplicity.
- Export what you want from the backup to your computer.
- Your device's data remains intact during the restore process.
- Supports iPhone, iPad, iPod touch, and the latest iOS version.


1. Firstly, download Dr.Fone on your Windows or Mac. Install it on your system by following on-screen instructions.
2. Connect your iPhone X to the system and launch the Dr.Fone desktop application. From all the provided options, select “Phone Backup” to perform iPhone X backup.

3. The interface will let you pick the kind of data you wish to backup. If you want to take a complete backup of your device, enable the “Select all” option. Otherwise, you can simply pick the kind of content you wish to backup.

4. After making your selection, click on the “Backup” button to proceed.
5. Sit back and relax as the application will perform iPhone X backup of the content that you have selected. Make sure that your device won’t be disconnected during the process. You can also view the progress from the screen as well.

6. When the entire process would be completed successfully, you will be notified. From the application’s native interface, you can simply preview your backup as well. It would be segregated into different categories.

After completing the process, you can just disconnect your device safely and use it as per your needs.
Now when you know how to backup iPhone X in different ways, you would certainly be able to keep your data safe. Simply go with the option of your choice to backup iPhone X to iCloud, iTunes, or via Dr.Fone. We recommend Dr.Fone to take a selective backup of your data in a fast and reliable manner. It is a remarkable tool and will certainly make it easier for you to manage your iPhone data in a trouble-free manner.


Alice MJ
staff Editor